Multi-cluster applications with Consul Enterprise admin partitions
Consul admin partitions give organizations the option to define and administer boundaries for services using Consul. This can help organizations managing services across teams and business units. Teams can benefit from managing and customizing their own Consul environment, without impacting other teams, or other Consul environments.
Some organizations want to allow organizational or business units to deploy their own installations of Consul Enterprise on their own Kubernetes clusters. Centrally managing multiple Consul installations can be an operational challenge for organizations. Instead of giving teams their own clusters, the organization can consolidate these installations onto a shared multi-tenant server cluster. This cluster serves as the control plane for Consul clients in the tenant clusters, and ensures separation between tenants of the system. This deployment model provides teams the autonomy to configure Consul and application networking as they require. This increases the team's flexibility to manage application deployments, and eliminates the operational overhead associated with managing individual server clusters.
In this tutorial, you will install and configure Consul Enterprise on two Kubernetes clusters with Helm. You will configure Admin Partitions and deploy a micro-services application called HashiCups. The services will be distributed across these two Kubernetes clusters using Consul admin partitions. A diagram showing this architecture is displayed below.

Prerequisites
- An AWS account that is capable of deploying Amazon Elastic Kubernetes Service resources.
- A Consul Enterprise license. Request a trial license on the Consul Enterprise trial registration page.
Setting up the infrastructure
Clone GitHub repository
If using the sample repository, begin by cloning it locally, and change into the directory where the sample code is stored.
$ git clone https://github.com/hashicorp-education/learn-consul-kubernetes
Navigate into the repository folder.
$ cd learn-consul-kubernetes
Navigate into the project folder for this tutorial.
$ cd consul-enterprise-admin-partitions-eks
Uploading the Consul Enterprise license
Start the tutorial by placing your Consul Enterprise license file in the consul_enterprise/ directory before deploying the infrastructure. Terraform uploads the license on your behalf. Ensure the file is named consul.hclic
Deploy the Infrastructure
Start by initializing the terraform project.
$ terraform init
Next, review the terraform plan.
$ terraform plan
You are now ready to deploy the infrastructure to AWS.
$ terraform apply -auto-approve
The infrastructure deployment takes approximately 30-40 minutes. You can use this time to review this tutorial, or watch the video below, demonstrating the usage and benefits of Consul admin partitions.
Deploying Kubernetes
Throughout the tutorial, you will complete tasks in context of Kubernetes and Consul Enterprise. To keep track, make note of the labels for each Consul and Kubernetes identifier:
Kubernetes cluster primary manages the Consul Enterprise server cluster.
Kubernetes cluster secondary manages the Consul Enterprise client cluster.
License upload verification
Verify the Consul Enterprise license secret named consul-ent-license exists on both clusters with the two following commands.
$ kubectl get secrets --context primary --namespace consul
NAME                 TYPE     DATA   AGE
consul-ent-license   Opaque   1      18m
$ kubectl get secrets --context secondary --namespace consul
NAME                 TYPE     DATA   AGE
consul-ent-license   Opaque   1      95s
Installing Consul Enterprise with Helm
Add the HashiCorp helm chart repository to your helm installation.
$ helm repo add hashicorp https://helm.releases.hashicorp.com && helm repo update
Install Consul Enterprise with Helm by creating two values files for your Consul Enterprise installations. Navigate into the consul_enterprise folder.
$ cd consul_enterprise
For the Consul server cluster, create a values file named consul-values-server.yaml. For the Consul client cluster, create a values file named consul-values-client.yaml.
$ touch consul-values-server.yaml consul-values-client.yaml
The configuration for the server and the client clusters are shown below. Copy and paste each tab's content into the values files you previously created for the server and the client.
These files are configured for the tutorial. In non-tutorial deployments, make note of the highlighted lines. Your organization may have specific guidance for you to follow regarding the values in the highlighted lines.
Consul Enterprise values files
consul-values-server.yaml
global:
  # If you are using the sample repository, do not change the global.name values in the consul-values files.
  name: server
  image: 'hashicorp/consul-enterprise:1.22.7-ent'
  enableConsulNamespaces: true
  # The name of the datacenter. Admin partitions are only supported in the same datacenter today.
  datacenter: galaxy
  enterpriseLicense:
    # The Kubernetes secret key/value pair for your Consul Enterprise license. If using the terraform project provided with this tutorial
    # this license is automatically uploaded for you as a secret if you place the license inside the `consul_enterprise` folder before deploying.
    secretName: 'consul-ent-license'
    secretKey: 'key'
  # The stanza that sets up Admins Partitions and the reason you are reading this tutorial :)
  adminPartitions:
    enabled: true
    service:
      annotations: |
        "service.beta.kubernetes.io/aws-load-balancer-scheme": "internal"
  acls:
    manageSystemACLs: true
  logLevel: 'debug'
  gossipEncryption:
    autoGenerate: true
  tls:
    enableAutoEncrypt: true
    enabled: true
    verify: false
    serverAdditionalDNSSANs:
      # Subject Alternative Names that the TLS certificate will validate. In this case,
      # these are wildcard values for Amazon EKS and Elastic Load Balancer services suppporting this tutorial.
      # Note that wildcard values are not recommended for use in production environments.
      - '*.us-east-1.elb.amazonaws.com'
      - '*.gr7.us-east-1.eks.amazonaws.com'
server:
  storageClass: "ebs-sc"
  exposeGossipAndRpcPorts: true
  replicas: 1
ui:
  enabled: true
connectInject:
  aclBindingRuleSelector: ''
  consulNamespaces:
    mirroringK8S: true
  transparentProxy:
    defaultEnabled: true
  # inject an envoy sidecar into every new pod, except for those with annotations that prevent injection
  enabled: true
  centralConfig:
    enabled: true
    # proxyDefaults is a raw json string that will be applied to all Connect
    # proxy sidecar pods that can include any valid configuration for the
    # configured proxy.
    # proxyDefaults: |
    #   {
    #     "envoy_prometheus_bind_addr": "0.0.0.0:9102"
    #   }
controller:
  enabled: true
dns:
  enabled: true
  enableRedirection: true
  proxy:
    enabled: true
meshGateway:
  enabled: true
When admin partitions are enabled, the Consul server cluster generates a partition for itself, named default. For Consul client clusters which register themselves to the Consul server cluster, these partition names are configurable in the global.adminPartitions stanza of the cluster's values file. For this tutorial, refer to line 14 of the consul-values-client.yaml values file shown above.
To learn more about Consul on Kubernetes, visit the Consul on Kubernetes repository.
Consul Enterprise Server
For the server Consul installation, install Consul Enterprise on the primary Kubernetes cluster.
$ kubectl config use-context primary && helm install --wait hashicorp-server hashicorp/consul --namespace consul --version "1.9.9" --values consul-values-server.yaml

Switched to context "primary".

NAME: hashicorp-server
LAST DEPLOYED: Thu Jun  4 14:45:57 2026
NAMESPACE: consul
STATUS: deployed
REVISION: 1
DESCRIPTION: Install complete
NOTES:
Thank you for installing HashiCorp Consul!

Your release is named hashicorp-server.

To learn more about the release, run:

  $ helm status hashicorp-server --namespace consul
  $ helm get all hashicorp-server --namespace consul

Consul on Kubernetes Documentation:
https://www.consul.io/docs/platform/k8s

Consul on Kubernetes CLI Reference:
https://www.consul.io/docs/k8s/k8s-cli
Next, fetch the ACL token from the primary cluster into a local environment variable. Later you will use it as an argument to authenticate Consul commands. The decoded value in your shell output will be different from the sample output below.
$ ACL_TOKEN=$(kubectl get secret server-bootstrap-acl-token --namespace consul --context primary --template '{{ .data.token | base64decode }}') && echo "${ACL_TOKEN}"

2a5f0240-8be6-98c3-5c37-9db4723f67ad
Verify theserver-server-0 pod for Consul Enterprise is present and active on the Kubernetes primary cluster.
$ kubectl get pods --namespace consul --context primary
NAME                                           READY   STATUS    RESTARTS   AGE
server-connect-injector-8566bd898-nc9vm        1/1     Running   0          5m19s
server-mesh-gateway-67cf75b74-wj4xq            1/1     Running   0          5m19s
server-server-0                                1/1     Running   0          5m19s
server-webhook-cert-manager-6c87496677-zs9v6   1/1     Running   0          5m19s
Confirm the Consul primary cluster has admin partitions enabled. Use the consul members command inside the server-server-0 pod, with the -token flag set to the ACL token.
$ kubectl exec -it server-server-0 --namespace consul -- consul members -token="${ACL_TOKEN}"
Defaulted container "consul" out of: consul, locality-init (init)
Node             Address           Status  Type    Build       Protocol  DC      Partition  Segment
server-server-0  10.100.1.51:8301  alive   server  1.22.7+ent  2         galaxy  default    <all>
Observe the existence of the default partition name in the Partition column. The partition for the Consul server cluster is always named default.
Installing the Consul Enterprise client cluster.
Before installing Consul Enterprise on the Kubernetes secondary cluster, configure the Consul client installation to communicate with two following services:
The Kubernetes
primarycluster's Consul service.The Kubernetes control plane hosted on its own cluster.
Confirm the Kubernetes primary cluster has an active service named server-expose-servers with a value in the EXTERNAL-IP column.
$ kubectl get services --context primary --selector="app=consul,component=server" --namespace consul
NAME                    TYPE           CLUSTER-IP     EXTERNAL-IP                                                               PORT(S)                                                                            AGE
server-expose-servers   LoadBalancer   172.20.2.247   a4b43a982d09e49f19bc8ade96196df4-1033730269.us-east-1.elb.amazonaws.com   8501:30776/TCP,8301:30850/TCP,8300:30108/TCP,8502:32398/TCP                        40m
server-server           ClusterIP      None           <none>                                                                    8501/TCP,8502/TCP,8301/TCP,8301/UDP,8302/TCP,8302/UDP,8300/TCP,8600/TCP,8600/UDP   40m
This service is created by Consul during the Helm installation. This value is a hostname or IP address. A Consul client uses this hostname to access and register its admin partition with the Consul Enterprise server cluster. Copy this hostname. A shortcut to obtain the EXTERNAL-IP is provided below.
$ kubectl get services --context primary --selector="app=consul,component=server" --namespace consul --output jsonpath="{range .items[*]}{@.status.loadBalancer.ingress[*].hostname}{end}";echo
a4b43a982d09e49f19bc8ade96196df4-1033730269.us-east-1.elb.amazonaws.com
Edit the file consul-values-client.yaml, adding the hostname as a value for the client.join and externalServers.host keys. This hostname has no protocol prefix.
Next, copy the control-plane hostname for the secondary Kubernetes cluster. A shortcut is provided below.
$ TERM=dumb kubectl --context secondary cluster-info | awk '/Kubernetes control plane/ {print $NF}'
https://31CFBFE9CD85D9404B0E1E7EE4630304.gr7.us-east-1.eks.amazonaws.com
The environment variable passed to kubectl, TERM=dumb, removes the stylization of text that cluster-info outputs when returning the hostname. This can cause issues when copying and pasting text, when the stylization is present.
Update the externalServers.k8sAuthMethodHost key with the control-plane hostname of the secondary Kubernetes cluster. Make sure to include the https:// protocol prefix in this value.
The following sample file shows the keys and locations you will need to update in the consul-values-client.yaml file.
consul-values-client.yaml
externalServers:
  enabled: true
  hosts:
    # The hostname of the admin-partition `LoadBalancer` service Running on the server cluster
    - YourValueGoesHere
  useSystemRoots: false
  # The client cluster's hostname for the Kubernetes control plane. Obtained by running `kubectl --cluster-info` for that cluster.
  k8sAuthMethodHost: YourValueGoesHere
client:
  enabled: true
  join:
    # The hostname of the admin-partition `LoadBalancer` service Running on the server cluster
    - YourValueGoesHere
Secrets Management for the Consul client cluster
For the Consul client installation, configure the Consul Enterprise clusters to use HTTPS. The Consul server cluster is already configured to use HTTPS. However, the Consul client cluster requires you to perform a few actions before enabling HTTPS.
Copy the HTTPS CA certifcate and HTTPS CA Key from the primary Kubernetes cluster to the secondary Kubernetes cluster.
$ kubectl get --namespace consul secret server-ca-cert --context primary -o yaml | kubectl apply --context secondary --namespace consul --filename - && kubectl get --namespace consul secret server-ca-key --context primary -o yaml  | kubectl apply --namespace consul --context secondary --filename -

  secret/server-ca-cert created
  secret/server-ca-key created
The Consul Enterprise client cluster needs additional secrets generated by the Consul Enterprise server installation. These secrets let the client authenticate, and communicate with the Consul server cluster. You will need access control list (ACL) tokens for the admin partition, client services, and for the initial bootstrap of the Consul client cluster. You will also need the gossip encryption key required to use gossip encryption on the Consul client cluster.
Use the commands below to copy the secrets from the primary Kubernetes cluster to the secondary Kubernetes cluster.
Partition Token
$ kubectl get --namespace consul secret server-partitions-acl-token --context primary -o yaml   | kubectl apply --namespace consul --context secondary --filename -

secret/server-partitions-acl-token created
Bootstrap ACL Token
$ kubectl get --namespace consul secret server-bootstrap-acl-token --context primary -o yaml   | kubectl apply --namespace consul --context secondary --filename -

secret/server-bootstrap-acl-token created
Gossip Encryption Key
$ kubectl get --namespace consul secret server-gossip-encryption-key --context primary -o yaml | kubectl apply --namespace consul --context secondary --filename -

secret/server-gossip-encryption-key created
Confirm the secrets copied from the primary Kubernetes cluster, are present on the secondary Kubernetes cluster.
$ kubectl get secrets --namespace consul --context secondary
NAME                           TYPE     DATA   AGE
consul-ent-license             Opaque   1      44m
server-bootstrap-acl-token     Opaque   1      21s
server-ca-cert                 Opaque   1      2m
server-ca-key                  Opaque   1      117s
server-gossip-encryption-key   Opaque   1      7s
server-partitions-acl-token    Opaque   1      101s
The secondary Kubernetes cluster is prepared for Consul client cluster installation. Deploy theconsul-values-client.yaml chart with Helm.
$ kubectl config use-context secondary && helm install --wait hashicorp-client hashicorp/consul --namespace consul --version "1.9.9" --values consul-values-client.yaml

Switched to context "secondary".

NAME: hashicorp-client
LAST DEPLOYED: Thu Jun  4 15:10:17 2026
NAMESPACE: consul
STATUS: deployed
REVISION: 1
DESCRIPTION: Install complete
NOTES:
Thank you for installing HashiCorp Consul!

Your release is named hashicorp-client.

To learn more about the release, run:

  $ helm status hashicorp-client --namespace consul
  $ helm get all hashicorp-client --namespace consul

Consul on Kubernetes Documentation:
https://www.consul.io/docs/platform/k8s

Consul on Kubernetes CLI Reference:
https://www.consul.io/docs/k8s/k8s-cli
Confirm the Consul Enterprise services and pods on the secondary Kubernetes cluster have been deployed successfully. Issue the commands below in your environment for verification.
$ kubectl get svc --namespace consul --context secondary
NAME                      TYPE           CLUSTER-IP       EXTERNAL-IP                    PORT(S)         AGE
client-connect-injector   ClusterIP      10.100.179.82    <none>                         443/TCP         115m
client-dns                ClusterIP      10.100.118.55    <none>                         53/TCP,53/UDP   115m
client-mesh-gateway       LoadBalancer   10.100.121.250   a619db8e5638b402ba135740192f9f89-282436653.us-east-1.elb.amazonaws.com   443:32124/TCP   115m
Verify the pods for Consul Enterprise are present and active on the Kubernetes secondary cluster.
$ kubectl get pods --namespace consul --context secondary
NAME                                           READY   STATUS    RESTARTS   AGE
client-client-ksqsz                            1/1     Running   0          117m
client-client-lgms8                            1/1     Running   0          117m
client-client-s4q7w                            1/1     Running   0          117m
client-client-zrbpl                            1/1     Running   0          117m
client-connect-injector-57978c9c64-dwvff       1/1     Running   0          117m
client-mesh-gateway-6b8bd994f6-l2mr9           1/1     Running   0          117m
client-webhook-cert-manager-674c4c98ff-m6csd   1/1     Running   0          117m
Note the difference from the output of this command in comparison to previously inputting the same command on the Consul primary cluster. There is no server-server-0 pod running on this Kubernetes cluster, nor a consul-partition-service service.
Confirming the client cluster's admin partition.
When you deployed the file consul-values-client.yaml, a partition for the Consul client cluster was created, named tereknor. Confirm this admin partition is present on the Consul client cluster and is registered to the Consul server cluster.
From the output of the kubectl get pods --context secondary command above, use one of the client pods affixed with random characters on the end, such as client-client-ksqsz, to verify the members in the Consul client cluster.
$ kubectl exec --namespace consul -it --context secondary -c consul client-client-ksqsz -- consul members

Node                                           Address         Status  Type    Build       Protocol  DC     Partition  Segment
ip-172-30-1-129.us-east-1.compute.internal  172.30.1.230:8301  alive   client  1.22.7+ent  2         galaxy tereknor
ip-172-30-1-174.us-east-1.compute.internal  172.30.1.209:8301  alive   client  1.22.7+ent  2         galaxy tereknor
ip-172-30-2-150.us-east-1.compute.internal  172.30.2.112:8301  alive   client  1.22.7+ent  2         galaxy tereknor
ip-172-30-2-62.us-east-1.compute.internal   172.30.2.214:8301  alive   client  1.22.7+ent  2         galaxy tereknor
For additional verification, check the logs on the same pod, with kubectl.
$ kubectl logs --namespace consul --context secondary client-client-ksqsz -c consul
[...]
2026-06-04T13:11:07.879Z [INFO]  agent: Joining cluster...: cluster=LAN
2026-06-04T13:11:07.879Z [INFO]  agent: (LAN) joining: lan_addresses=["a4b43a982d09e49f19bc8ade96196df4-1033730269.us-east-1.elb.amazonaws.com"]
2026-07-10T15:18:32.859Z [INFO]  agent.client.serf.lan: serf: EventMemberJoin: ip-172-30-2-150.us-east-1.compute.internal 172.30.2.112
2026-07-10T15:18:32.965Z [INFO]  agent.client.serf.lan: serf: EventMemberJoin: ip-172-30-1-174.us-east-1.compute.internal 172.30.1.209
2026-07-10T15:18:32.965Z [INFO]  agent.client.serf.lan: serf: EventMemberJoin: server-server-0 10.100.1.51
2026-07-10T15:18:32.966Z [INFO]  agent.client.serf.lan: serf: EventMemberJoin: ip-172-30-1-129.us-east-1.compute.internal 172.30.1.230
2026-07-10T15:18:33.190Z [INFO]  agent.client.serf.lan: serf: EventMemberJoin: ip-172-30-2-62.us-east-1.compute.internal 172.30.2.214
2026-07-10T15:18:32.966Z [INFO]  agent.client: adding server: server="server-server-0 (Addr: tcp/10.100.1.51:8300) (DC: galaxy)"
2026-06-04T13:11:07.908Z [INFO]  agent: (LAN) joined: number_of_nodes=2
2026-06-04T13:11:07.908Z [INFO]  agent: Join cluster completed. Synced with initial agents: cluster=LAN num_agents=2
2026-06-04T13:11:08.505Z [INFO]  agent: Synced node info
To further verify the partition is registered to the Consul server cluster, use consul partition list. This command returns all partitions the Consul server cluster is aware of, and their descriptions. Use the variable $ACL_TOKEN as the argument for the -token flag.
$ kubectl exec -it --namespace consul --context primary server-server-0 -- consul partition list -token "${ACL_TOKEN}"
Defaulted container "consul" out of: consul, locality-init (init)
default:
   Description:
      Builtin Default Partition
tereknor:
   Description:
      Created by Helm installation
To observe the members of a specific partition, use consul catalog nodes with the --partition flag, using the $ACL_TOKEN to use this authenticated command.
$ kubectl exec -it --namespace consul --context primary server-server-0 -- consul catalog nodes --partition tereknor -token "${ACL_TOKEN}"
Defaulted container "consul" out of: consul, locality-init (init)
Node                                                ID        Address       Partition  DC
ip-172-30-1-129.us-east-1.compute.internal          8d066e41  172.30.1.230  tereknor   galaxy
ip-172-30-1-174.us-east-1.compute.internal          261a630e  172.30.1.209  tereknor   galaxy
ip-172-30-1-174.us-east-1.compute.internal-virtual            172.30.1.174  tereknor   galaxy
ip-172-30-2-150.us-east-1.compute.internal          883651fc  172.30.2.112  tereknor   galaxy
ip-172-30-2-62.us-east-1.compute.internal           613bb3a3  172.30.2.214  tereknor   galaxy
Deploy HashiCups as a distributed application
To deploy an application to your cluster, you will use HashiCups, a micro-services architecture. HashiCups serves as a shopping cart for HashiCorp-themed beverages. It has specific permissions for service communication: Its database communicates with a product API service. The front end communicates with a public API service. The public api brokers communication between the product api and the payments service.
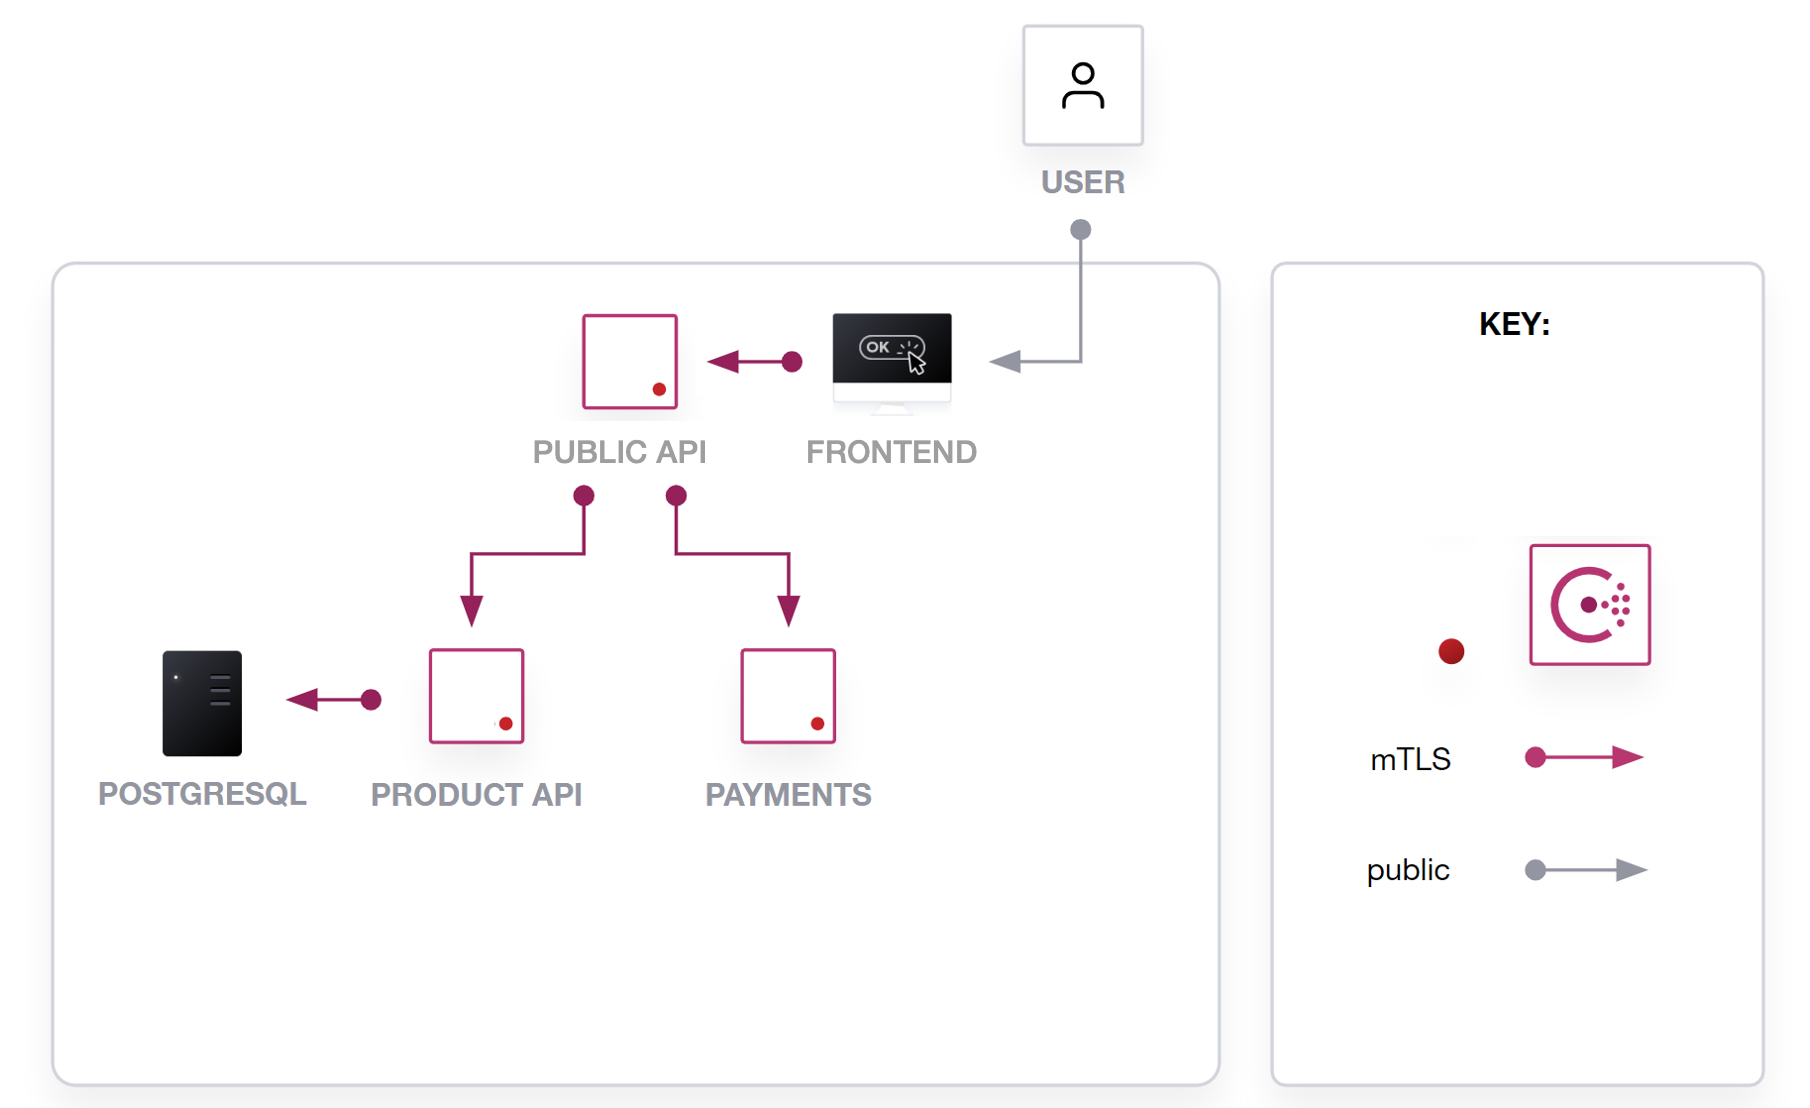
In this tutorial, the postgres database resides on the primary Kubernetes cluster, belonging to the Consul server cluster. This is a common database that other products can connect to, not just HashiCups. The remaining services are deployed to the secondary Kubernetes cluster, belonging to the client Consul Enterprise cluster.
With both Kubernetes clusters, any pod deployed will be bootstrapped with a consul agent to each container. When resources are deployed, they are assigned to the partition of that cluster. For the Consul server cluster, resources will belong to the default partition. For Consul client clusters, resources will belong to the tereknor partition.
Exporting services with Custom Resource Definitions
In your installation, Consul Enterprise is configured with Access Control Lists enabled. With ACLs enabled, you will export the services that communicate across partitions, namely the database service, and the products API. You will use Consul Intentions to grant services access to these cross-cluster services.
Primary Cluster
$ kubectl apply --filename hashicups/crds-primary/  --context primary
exportedservices.consul.hashicorp.com/default created
serviceintentions.consul.hashicorp.com/postgres created
proxydefaults.consul.hashicorp.com/global created
Secondary Cluster
$ kubectl apply --filename hashicups/crds-secondary --context secondary
exportedservices.consul.hashicorp.com/tereknor created
serviceintentions.consul.hashicorp.com/public-api created
serviceintentions.consul.hashicorp.com/products-api created
serviceintentions.consul.hashicorp.com/payments created
proxydefaults.consul.hashicorp.com/global created
Deploying HashiCups across clusters
The following code block groups create a tab for each service by their kind value in the Kubernetes plan file. To deploy the services, a final tab Complete is available in each code block group, containing all the of the services in one single continuous block. The deployment instructions reflect deploying the contents of this tab with a single file.
Primary Cluster
The database will be deployed inside Consul server cluster's default partition, on the primary Kubernetes cluster. Consul assigns the services to their partition automatically.
Database
Inspect hashicups/postgres.yaml.
Service: Database
---
apiVersion: v1
kind: Service
metadata:
  name: postgres
  labels:
    app: postgres
spec:
  type: ClusterIP
  ports:
    - port: 5432
      targetPort: 5432
  selector:
    app: postgres
---
apiVersion: consul.hashicorp.com/v1alpha1
kind: ServiceDefaults
metadata:
  name: postgres
spec:
  protocol: 'tcp'
---
apiVersion: v1
kind: ServiceAccount
metadata:
  name: postgres
automountServiceAccountToken: true
---
apiVersion: apps/v1
kind: Deployment
metadata:
  name: postgres
spec:
  replicas: 1
  selector:
    matchLabels:
      service: postgres
      app: postgres
  template:
    metadata:
      labels:
        service: postgres
        app: postgres
      annotations:
        prometheus.io/scrape: 'true'
        prometheus.io/port: '9102'
        consul.hashicorp.com/connect-inject: 'true'
    spec:
      serviceAccountName: postgres
      containers:
        - name: postgres
          image: hashicorpdemoapp/product-api-db:v0.0.22
          ports:
            - containerPort: 5432
          env:
            - name: POSTGRES_DB
              value: products
            - name: POSTGRES_USER
              value: postgres
            - name: POSTGRES_PASSWORD
              value: password
          # args: ['-c', 'listen_addresses=127.0.0.1']
          volumeMounts:
            - mountPath: '/var/lib/postgresql/data'
              name: 'pgdata'
      volumes:
        - name: pgdata
          emptyDir: {}
Deploy the database service:
$ kubectl apply --context primary --filename hashicups/postgres.yaml
service/postgres created
servicedefaults.consul.hashicorp.com/postgres created
serviceaccount/postgres created
deployment.apps/postgres created
Secondary Cluster
You will deploy the remaining HashiCups micro-services to the Consul client cluster's tereknor partition, on the secondary Kubernetes cluster. Consul assigns the services to their partition automatically.
Products API
Inspect hashicups/products-api.yaml.
Service: Products API
---
apiVersion: v1
kind: Service
metadata:
  name: products-api
  labels:
    app: products-api
spec:
  selector:
    app: products-api
  ports:
    - name: http
      protocol: TCP
      port: 9090
      targetPort: 9090
---
apiVersion: v1
kind: ServiceAccount
metadata:
  name: products-api
automountServiceAccountToken: true
---
apiVersion: consul.hashicorp.com/v1alpha1
kind: ServiceDefaults
metadata:
  name: products-api
spec:
  protocol: 'tcp'
---
apiVersion: v1
kind: ConfigMap
metadata:
  name: db-configmap
data:
  config: |
    {
      "db_connection": "host=postgres.virtual.default.ns.default.ap.galaxy.dc.consul port=5432 user=postgres password=password dbname=products sslmode=disable",
      "bind_address": ":9090",
      "metrics_address": ":9103"
    }
---
apiVersion: apps/v1
kind: Deployment
metadata:
  name: products-api
  labels:
    app: products-api
spec:
  replicas: 1
  selector:
    matchLabels:
      app: products-api
  template:
    metadata:
      labels:
        app: products-api
      annotations:
        prometheus.io/scrape: 'true'
        prometheus.io/port: '9102'
        consul.hashicorp.com/connect-inject: 'true'
    spec:
      serviceAccountName: products-api
      volumes:
        - name: config
          configMap:
            name: db-configmap
            items:
              - key: config
                path: conf.json
      containers:
        - name: products-api
          image: hashicorpdemoapp/product-api:v0.0.22
          imagePullPolicy: Always
          ports:
            - containerPort: 9090
            - containerPort: 9103
          env:
            - name: 'CONFIG_FILE'
              value: '/config/conf.json'
          livenessProbe:
            httpGet:
              path: /health
              port: 9090
            initialDelaySeconds: 15
            timeoutSeconds: 1
            periodSeconds: 10
            failureThreshold: 30
          volumeMounts:
            - name: config
              mountPath: /config
              readOnly: true
Review line 37, which illustrates how communication between admin partitions is initiated. The construct is [service-name].virtual.[remote-namespace].ns.[remote-partition].ap.[remote-dc].dc.consul, and in this example the target is host=postgres.virtual.default.ns.tereknor.ap.galaxy.dc.consul. This is the communication directive you enabled earlier in the ExportedService Kubernetes CRDs.
Deploy the Products API service:
$ kubectl apply --context secondary --filename hashicups/products-api.yaml
service/products-api created
serviceaccount/products-api created
servicedefaults.consul.hashicorp.com/products-api created
configmap/db-configmap created
deployment.apps/products-api created
Public API
Inspect hashicups/public-api.yaml.
Service: Public API
---
apiVersion: v1
kind: Service
metadata:
  name: public-api
  labels:
    app: public-api
spec:
  type: ClusterIP
  ports:
    - port: 8080
      targetPort: 8080
  selector:
    app: public-api
---
apiVersion: v1
kind: ServiceAccount
metadata:
  name: public-api
automountServiceAccountToken: true
---
apiVersion: apps/v1
kind: Deployment
metadata:
  name: public-api
spec:
  replicas: 1
  selector:
    matchLabels:
      service: public-api
      app: public-api
  template:
    metadata:
      labels:
        service: public-api
        app: public-api
      annotations:
        prometheus.io/scrape: 'true'
        prometheus.io/port: '9102'
        consul.hashicorp.com/connect-inject: 'true'
    spec:
      serviceAccountName: public-api
      containers:
        - name: public-api
          image: hashicorpdemoapp/public-api:v0.0.7
          imagePullPolicy: Always
          ports:
            - containerPort: 8080
          env:
            - name: BIND_ADDRESS
              value: ':8080'
            - name: PRODUCT_API_URI
              value: 'http://products-api:9090'
            - name: PAYMENT_API_URI
              value: 'http://payments:1800'
        - name: jaeger-agent
          image: jaegertracing/jaeger-agent:latest
          imagePullPolicy: IfNotPresent
          ports:
            - containerPort: 5775
              name: zk-compact-trft
              protocol: UDP
            - containerPort: 5778
              name: config-rest
              protocol: TCP
            - containerPort: 6831
              name: jg-compact-trft
              protocol: UDP
            - containerPort: 6832
              name: jg-binary-trft
              protocol: UDP
            - containerPort: 14271
              name: admin-http
              protocol: TCP
          args:
            - --reporter.grpc.host-port=dns:///jaeger-collector-headless.default:14250
            - --reporter.type=grpc
Deploy the Public API service:
$ kubectl apply --context secondary --filename hashicups/public-api.yaml
service/public-api created
serviceaccount/public-api created
deployment.apps/public-api created
Payments
Inspect hashicups/payments.yaml.
Service: Payments API
---
apiVersion: v1
kind: Service
metadata:
  name: payments
  labels:
    app: payments
spec:
  selector:
    app: payments
  ports:
    - name: http
      protocol: TCP
      port: 1800
      targetPort: 8080
---
apiVersion: v1
kind: ServiceAccount
metadata:
  name: payments
automountServiceAccountToken: true
---
apiVersion: consul.hashicorp.com/v1alpha1
kind: ServiceDefaults
metadata:
  name: payments
spec:
  protocol: 'http'
---
apiVersion: apps/v1
kind: Deployment
metadata:
  name: payments
  labels:
    app: payments
spec:
  replicas: 1
  selector:
    matchLabels:
      app: payments
  template:
    metadata:
      labels:
        app: payments
      annotations:
        consul.hashicorp.com/connect-inject: 'true'
    spec:
      serviceAccountName: payments
      containers:
        - name: payments
          image: hashicorpdemoapp/payments:v0.0.16
          imagePullPolicy: Always
          ports:
            - containerPort: 8080
Deploy the Payments service:
$ kubectl apply --context secondary --filename hashicups/payments.yaml
service/payments created
serviceaccount/payments created
servicedefaults.consul.hashicorp.com/payments created
deployment.apps/payments created
Frontend
Inspect hashicups/frontend.yaml.
Service: Frontend
apiVersion: v1
kind: Service
metadata:
  name: frontend
  labels:
    app: frontend
spec:
  type: LoadBalancer
  ports:
    - port: 80
      targetPort: 80
  selector:
    app: frontend
---
apiVersion: v1
kind: ServiceAccount
metadata:
  name: frontend
automountServiceAccountToken: true
---
apiVersion: consul.hashicorp.com/v1alpha1
kind: ServiceDefaults
metadata:
  name: frontend
spec:
  protocol: http
---
apiVersion: v1
kind: ConfigMap
metadata:
  name: nginx-configmap
data:
  config: |
    # /etc/nginx/conf.d/default.conf
    server {
        listen       80;
        server_name  localhost;

        #charset koi8-r;
        #access_log  /var/log/nginx/host.access.log  main;

        location / {
            root   /usr/share/nginx/html;
            index  index.html index.htm;
        }

        # Proxy pass the api location to save CORS
        # Use location exposed by Consul connect
        location /api {
            proxy_pass http://public-api:8080;
            proxy_http_version 1.1;
            proxy_set_header Upgrade $http_upgrade;
            proxy_set_header Connection "Upgrade";
            proxy_set_header Host $host;
        }

        error_page   500 502 503 504  /50x.html;
        location = /50x.html {
            root   /usr/share/nginx/html;
        }
    }

---
apiVersion: apps/v1
kind: Deployment
metadata:
  name: frontend
spec:
  replicas: 1
  selector:
    matchLabels:
      service: frontend
      app: frontend
  template:
    metadata:
      labels:
        service: frontend
        app: frontend
      annotations:
        prometheus.io/scrape: 'true'
        prometheus.io/port: '9102'
        consul.hashicorp.com/connect-inject: 'true'
    spec:
      serviceAccountName: frontend
      volumes:
        - name: config
          configMap:
            name: nginx-configmap
            items:
              - key: config
                path: default.conf
      containers:
        - name: frontend
          image: hashicorpdemoapp/frontend-nginx:v1.0.9
          imagePullPolicy: Always
          ports:
            - containerPort: 80
          volumeMounts:
            - name: config
              mountPath: /etc/nginx/conf.d
              readOnly: true
Deploy the Frontend service:
$ kubectl apply --context secondary --filename hashicups/frontend.yaml
service/frontend created
serviceaccount/frontend created
servicedefaults.consul.hashicorp.com/frontend created
configmap/nginx-configmap created
deployment.apps/frontend created
Validation steps
Next, verify the HashiCups deployment is active.
HashiCups services are deployed
Observe the pods for each Kubernetes plan file you deployed are in a ready state according to the READY column. Each pod is ready when all defined pods are available. For example, the public-api is defined with 3 pods. In the output below, 3 of 3 pods are ready.
$ kubectl get pods --namespace consul --context secondary
NAME                                           READY   STATUS    RESTARTS   AGE
client-client-ksqsz                            1/1     Running   0          128m
client-client-lgms8                            1/1     Running   0          128m
client-client-s4q7w                            1/1     Running   0          128m
client-client-zrbpl                            1/1     Running   0          128m
client-connect-injector-57978c9c64-dwvff       1/1     Running   0          128m
client-dns-proxy-bd98b967d-mj6nd               1/1     Running   0          128m
client-mesh-gateway-6b8bd994f6-l2mr9           1/1     Running   0          128m
client-webhook-cert-manager-674c4c98ff-m6csd   1/1     Running   0          128m
$ kubectl get pods --context secondary
NAME                           READY   STATUS     RESTARTS   AGE
frontend-7698f6f644-x5g7v      2/2     Running    0          53s
payments-77c686f875-hcvh6      2/2     Running    0          75s
products-api-c458dc7cf-49tqw   2/2     Running    0          106s
public-api-5869f8696f-j6vrr    3/3     Running    0          92s
HashiCups frontend is reachable
Open a new terminal and run a kubectl port forward to the frontend service in order to verify it is functioning correctly. In this example, you are port forwarding from your local machine's port 8080 to frontend:80.
$ kubectl port-forward --context secondary services/frontend 8080:80
Forwarding from 127.0.0.1:8080 -> 80
Forwarding from [::1]:8080 -> 80
Open http://127.0.0.1:8080 in your browser and the HashiCups front page loads, containing a graphical carousel of different types of HashiCups beverages.
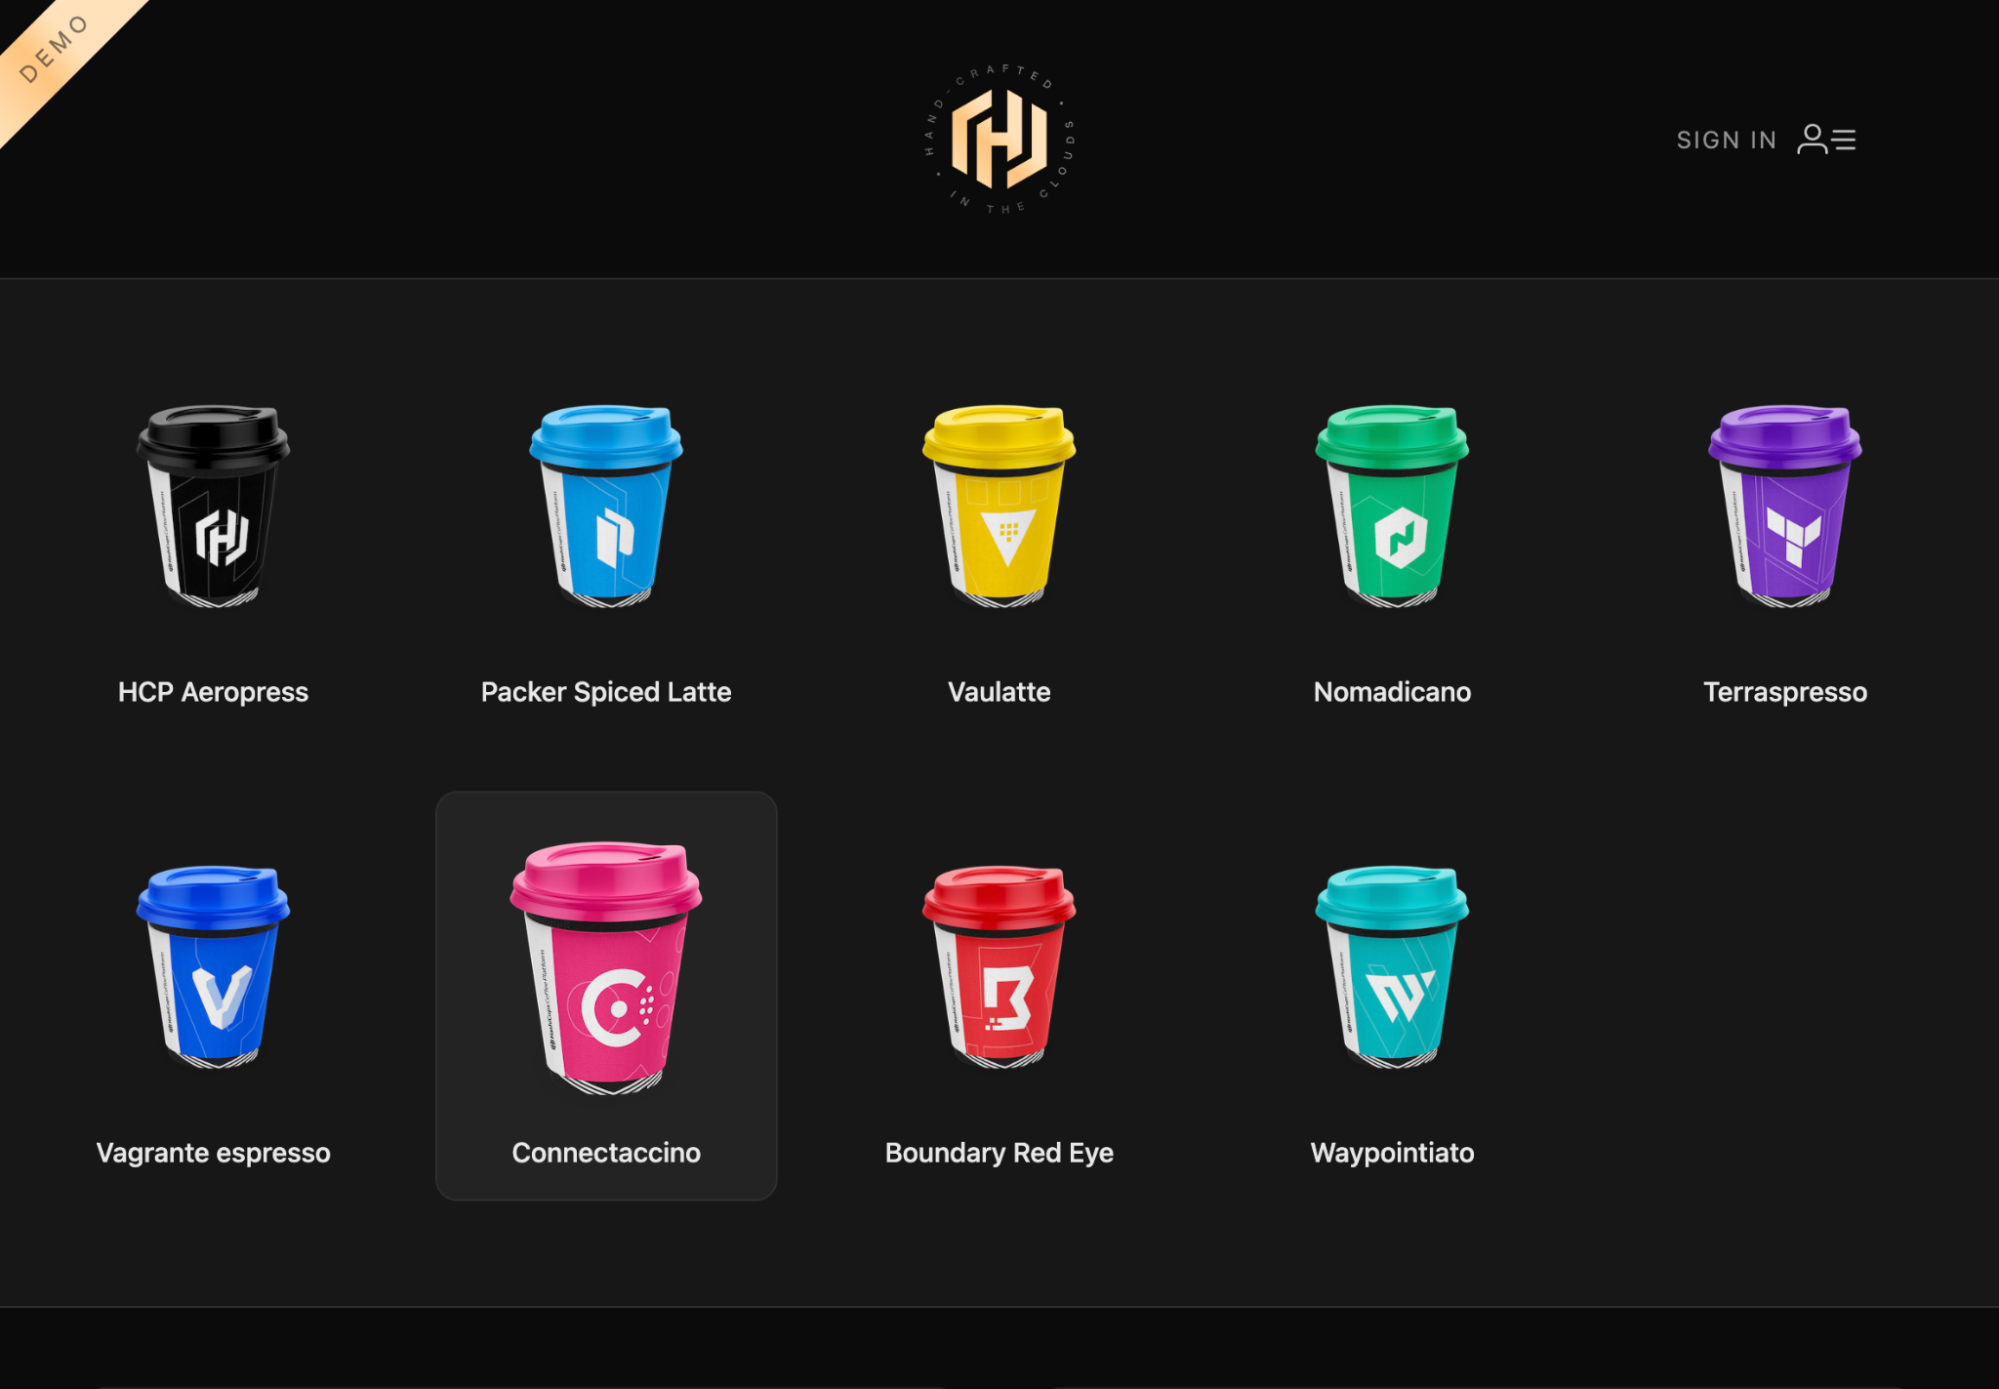
Database can be written to by the frontend
In the portal, select a beverage and click on the Buy button. Enter in fake credit card information and press Submit Payment.
You should receive a notification that your order was processed successfully, if the database in the primary cluster is communicating with services across the Consul and Kubernetes clusters.

Cleanup
Use terraform to remove the infrastructure from your account, now that this tutorial is complete. With AWS, this takes approximately 20 minutes.
$ cd .. && terraform destroy -auto-approve
Every effort has been made to make the cleanup of infrastructure resources in Terraform seamless. However, there are known issues with Terraform and the AWS provider, in which EKS creates resources for itself, not managed by Terraform, causing issues with removing all resources. A shim script in this repository mitigates this issue during terraform destroy. Due to timing of the Amazon API when removing resources, you may encounter issues where the infrastructure does not completely finish its removal. Inputting terraform destroy again should resolve the issue. But if not, you will need to remove the resources manually, from your AWS account.
Next steps
In this tutorial, you deployed a micro-services application, HashiCups, across multiple Kubernetes and Consul Enterprise clusters. You deployed a frontend service connected to a database deployed to another Kubernetes cluster, inside of another network. You confirmed that the client partition was registered to the server Consul Enterprise cluster.
To reiterate, Consul admin partitions give organizations the option to define and administer boundaries for services using Consul. This can assist organizations managing services across teams and business units. Teams can now benefit from managing and customizing their own Consul environment, without any impact to other Consul environments.
To learn more about admin partitions: