OIDC authentication with Okta
Before a client can interact with Vault, it must authenticate against an auth method to acquire a token. This token has policies attached so that the behavior of the client can be governed.
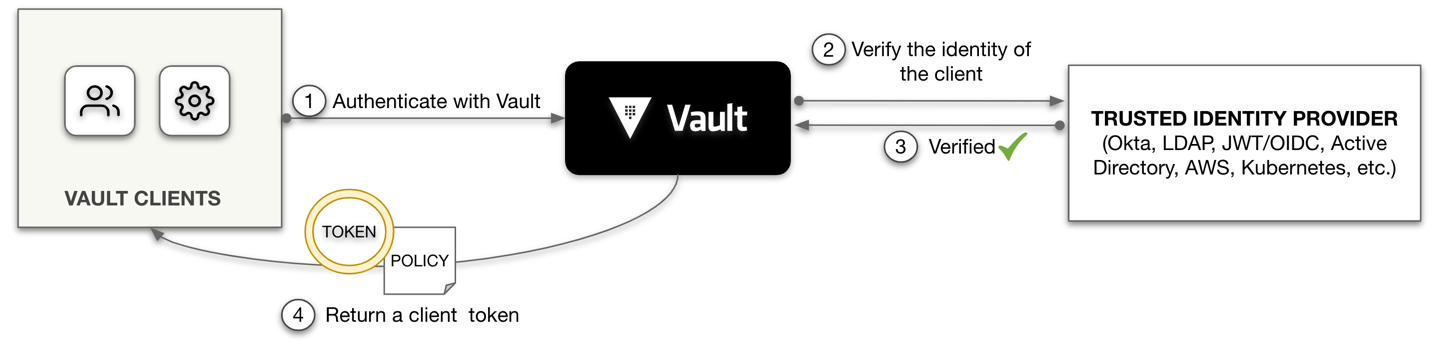
Auth methods perform authentication to verify the user or machine-supplied information. Some of the supported auth methods are targeted towards users while others are targeted toward machines or apps.
Challenge
Vault supports a number of auth methods for users or systems to prove their identity so that a token with appropriate policies can be obtained. Delegated authorization methods based on OAuth 2.0 are convenient for users and have become increasingly common, but the identity semantics are vague and vary between providers.
Solution
Vault supports OpenID Connect (OIDC). OIDC provides an identity layer on top of OAuth 2.0 to address the shortcomings of using OAuth 2.0 for establishing identity. The OIDC auth method allows a user's browser to be redirected to a configured identity provider, complete login, and then be routed back to Vault's UI or CLI with a new Vault token.
This method is familiar for most users, and centralizes identity management. For operators, the types of identity data provided as part of OIDC allow for flexible mapping to Vault's identity system.
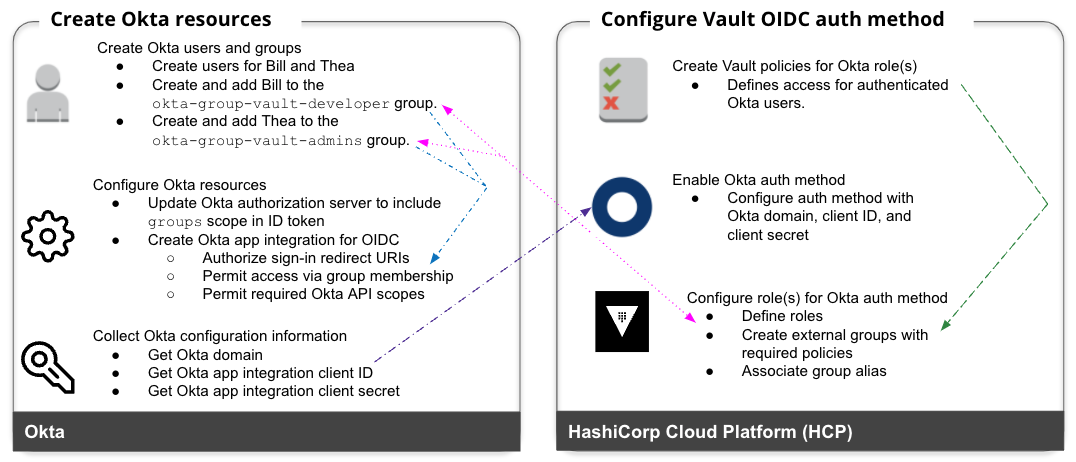
In this tutorial, you will create and configure the necessary resources in Okta to support the Vault OIDC auth method to allow policies to be assigned based on an Okta users group membership.
Prerequisites
To complete this tutorial you should have familiarity with, and access to HCP Vault Dedicated or Vault Community Edition, and Okta.
Visit the Getting Started with HCP Vault Dedicated tutorials for a refresher on how to deploy and configure Vault Dedicated.
The following items must be deployed and configured before you begin:
- Administrator access to an Okta Classic Engine account (Okta Developer Edition can be used for this tutorial).
- HashiCorp Vault binary installed on your local system. Please see the Install Vault guide for more information.
If you are using HCP Vault Dedicated:
- HashiCorp Virtual Network (HVN) created in the HCP Portal.
- A Vault cluster (Development tier or higher) with a public address (Refer to the Create a Vault Cluster on HCP tutorial tutorial).
Making your HCP Vault Dedicated cluster publicly accessible is not recommended, however for ease of completing this tutorial we suggest you have it enabled.
If you are using Vault Community Edition:
- Vault started in dev server mode. (Refer to the Vault tab in the lab setup section).
Lab setup
Launch the HCP Portal and login.
Click Vault in the left navigation pane.
In the Vault clusters pane, click vault-cluster.
Under Cluster URLs, click Public Cluster URL.
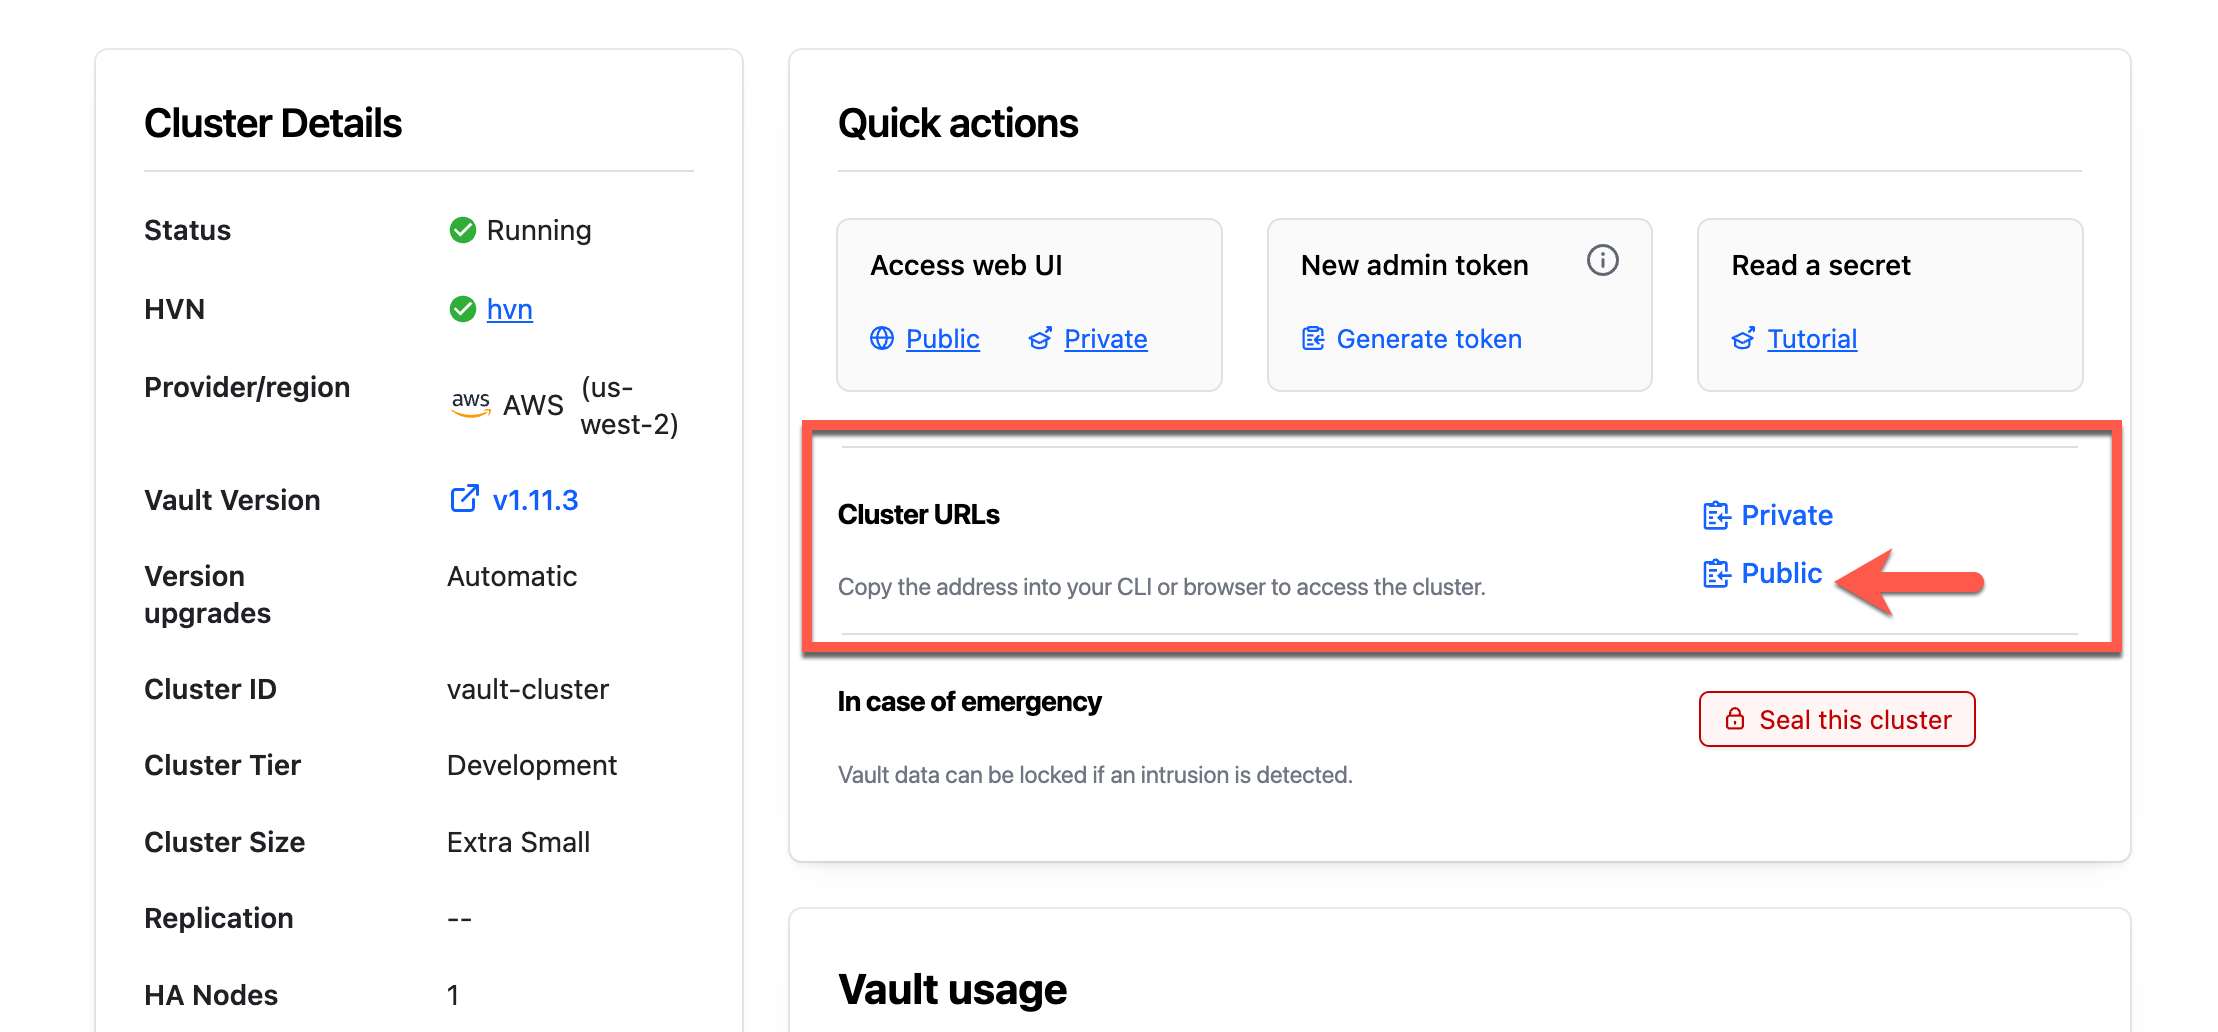
In a terminal, set the
VAULT_ADDRenvironment variable to the copied address.$ export VAULT_ADDR=<Public_Cluster_URL>Return to the Overview page and click Generate token.
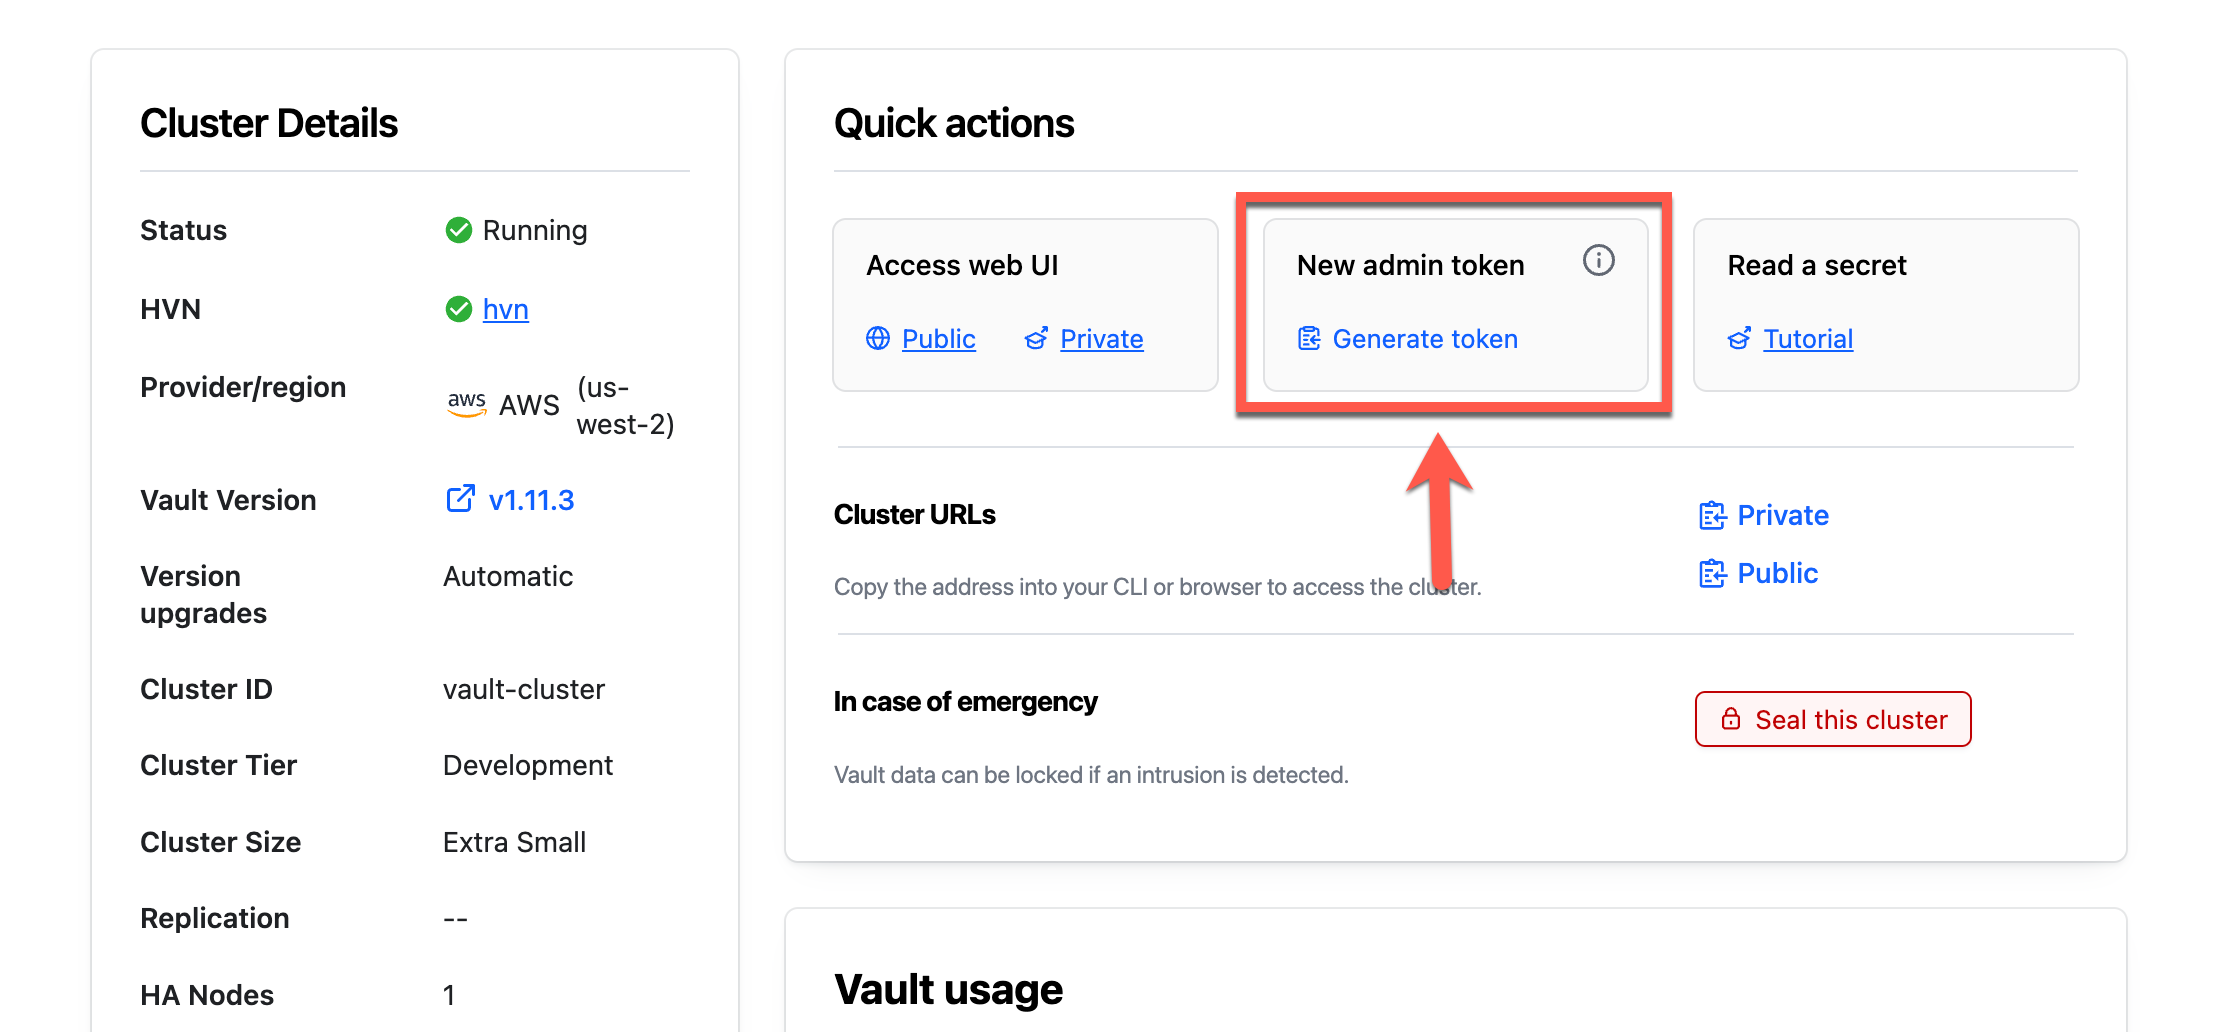
Within a few moments, a new token will be generated.
Copy the Admin Token.
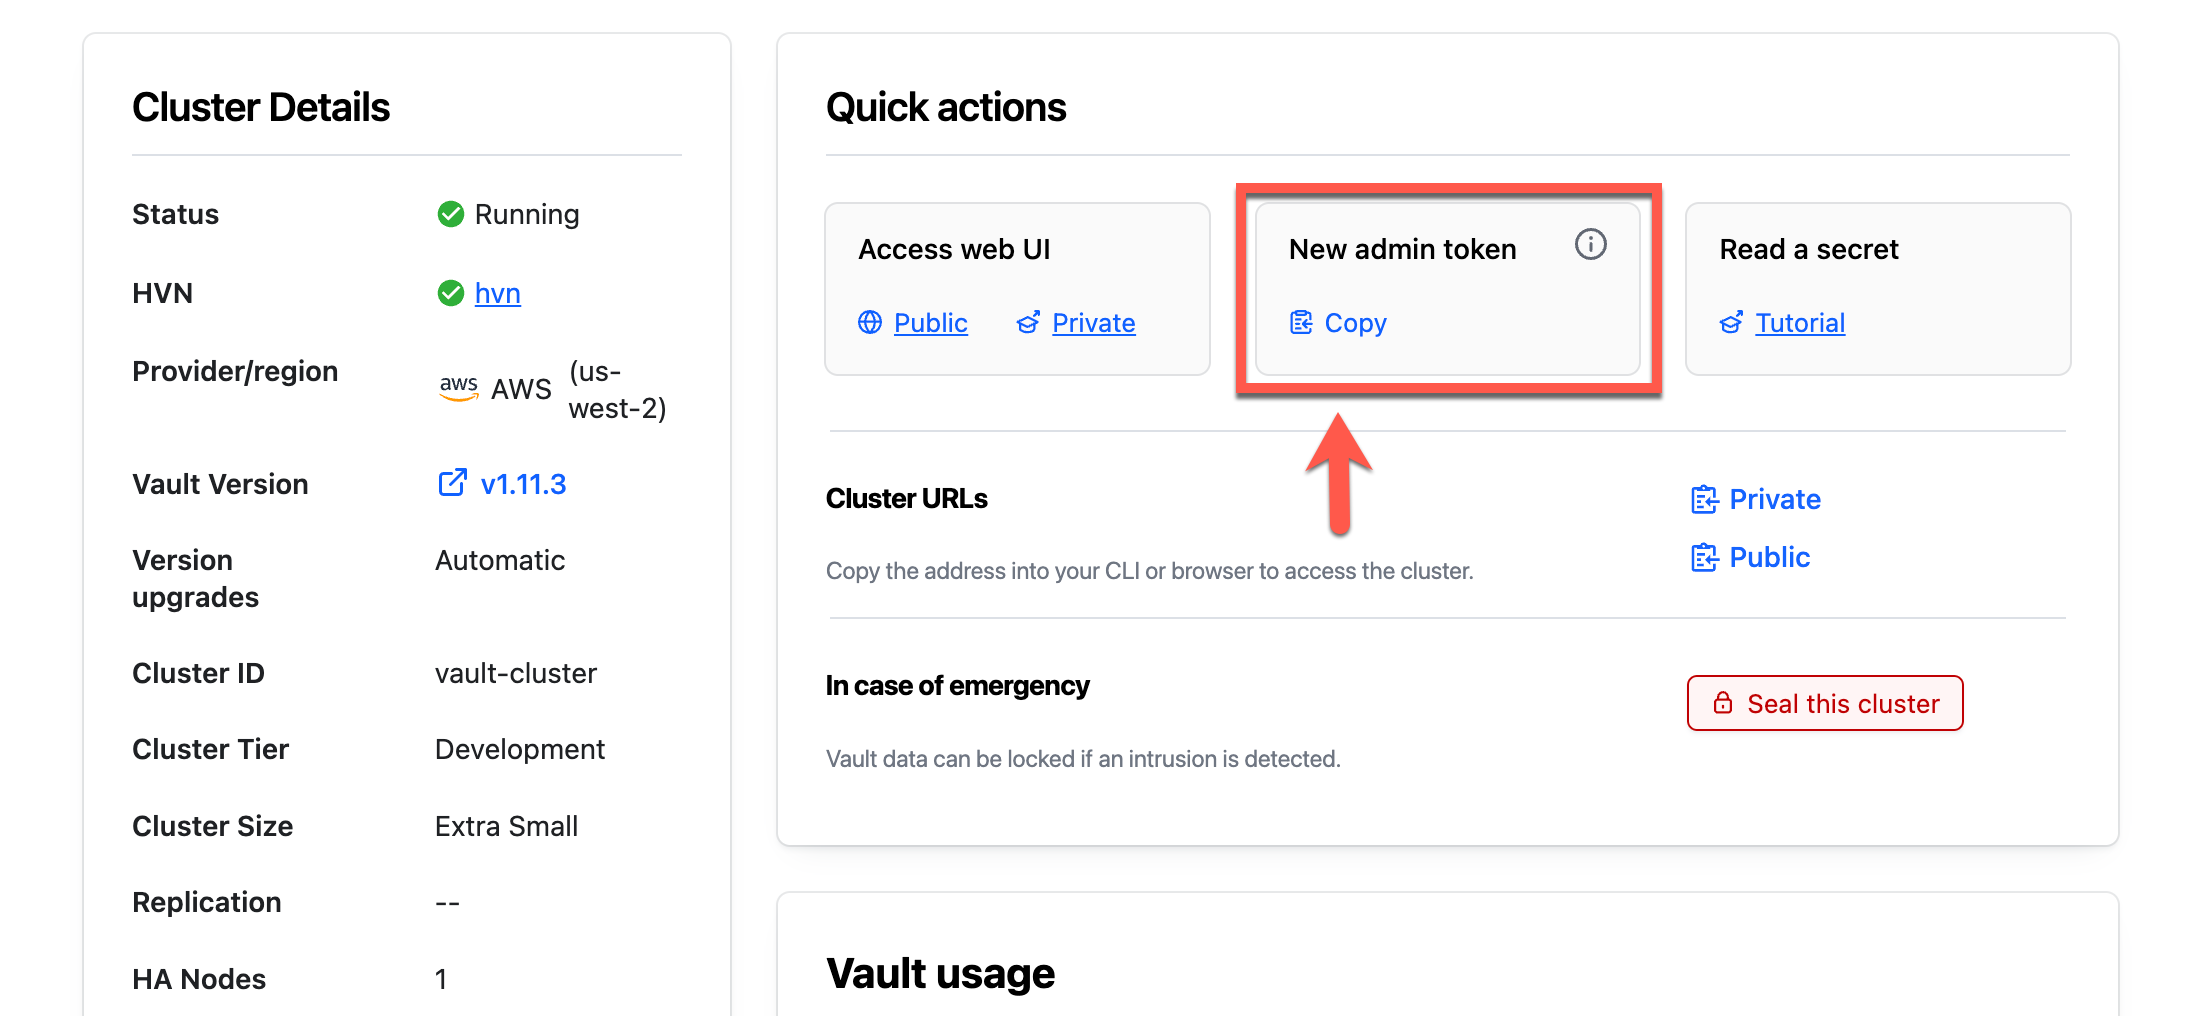
Return to the terminal and set the
VAULT_TOKENenvironment variable.$ export VAULT_TOKEN=<token>Set the
VAULT_NAMESPACEenvironment variable toadmin.$ export VAULT_NAMESPACE=adminType
vault statusto verify your connectivity to the Vault cluster.$ vault status Key Value --- ----- Recovery Seal Type shamir Initialized true Sealed false Total Recovery Shares 1 Threshold 1 Version 1.9.2+ent Storage Type raft ...snipped...With the
VAULT_TOKENenvironment variable set, you can now explore your Vault cluster. Typevault auth listto view the list of available auth methods.$ vault auth list Path Type Accessor Description ---- ---- -------- ----------- token/ ns_token auth_ns_token_d6310fa6 token based credentialsAll new Vault clusters will have the
tokenauth method enabled.
Okta setup
If you do not have an Okta account, sign up for an Okta Integrator Free Plan account.
Okta users and groups
To demonstrate authentication and policy assignment based on group membership you will create two users, and two groups in Okta.
Launch the Okta portal and login.
In the Okta dashboard, expand Directory in the left navigation menu and click People.
Click the Add person button and enter the following:
- User type: User
- First name: Thea
- Last name: Example
- Username: thea@example.com
- Password: Set by admin
- Enter password: Password1!
- Uncheck the User must change password on first login checkbox
Click the Save and Add Another button and enter the following:
- User type: User
- First name: Bill
- Last name: Example
- Username: bill@example.com
- Password: Set by admin
- Enter password: Password1!
- Uncheck the User must change password on first login checkbox
Click the Save button.
Click Groups in the left navigation menu.
Click the Add Group button, name the group
okta-group-vault-adminsand click the Save button.Click the Add Group button, name the group
okta-group-vault-developerand click the Save button.Click on okta-group-vault-admins and click the Assign people button.
Click the + button next to Thea Example to add that user to the group.
Click Groups in the left navigation menu.
Click on okta-group-vault-developer and click the Assign people button.
Click the + button next to Bill Example to add that user to the group.
You have created two users - Thea and Bill. You then assigned each to an Okta group - okta-group-vault-admins and okta-group-vault-developer.
Okta OIDC configuration
Expand Security in the left navigation menu and click API.
Click default and then click the Claims tab.
Click the + Add Claim button and enter the following:
- Name: groups
- Include in token type: ID Token / Always
- Value type: Groups
- Filter: Starts with / okta-group-vault
- Include in: Click the The following scopes: radio button
- In the text box below The following scopes: type
profileand click profile when it appears.
Click the Create button.
You have updated the default authorization server to include groups with the token ID. Adding groups to the token ID will allow you to assign a Vault policy based on the Okta group membership.
Expand Applications in the left navigation menu and click Applications.
Click the Create App Integration button.
Click the OIDC - OpenID Connect radio button, a new section will appear.
Click the Web Application radio button and then click the Next button.
In the App integration name text box enter
hc-vault.In the Grant type section, expand Advanced, click the checkbox for Implicit (hybrid).
Remove any existing Sign-in redirect URIs by clicking the X button.
Click the + Add URI button - an empty text box will appear.
Retrieve and copy the address of the Vault cluster stored in the
VAULT_ADDRenvironment variable.$ echo $VAULT_ADDREnter the address of your Vault cluster followed by
/ui/vault/auth/oidc/oidc/callback.
This URI will support authenticating a user via the Vault UI.
Click the + Add URI button again. Enter
http://localhost:8250/oidc/callback.This URI supports authenticating a user via the Vault CLI. For more information visit the JWT/OIDC auth method documentation.
Scroll to the bottom of the form.
In the Assignments section, click the Limit access to selected groups radio button.
In the Selected group(s) text box, enter
okta-groupand click okta-group-vault-admins.Enter
okta-groupagain and click okta-group-vault-developer.Click the Save button.
Click the Sign On tab.
In the OpenID Connect ID Token section, click Edit
In the Groups claim filter text box enter
okta-group-vault.Click the Save button.
Click the Okta API Scopes tab.
Find okta.groups.read in the list and click Grant.
Find okta.users.read.self in the list and click Grant.
You have created an application integration that will support OIDC and assigned the user groups you created to this integration.
Collect Okta configuration settings
Click the General tab.
Copy the Client ID.
Switch to your terminal and set an environment variable named
OKTA_CLIENT_ID.$ export OKTA_CLIENT_ID=<CLIENT_ID>Switch back to the Okta hc-vault configuration page and copy the Client secret.
Switch to your terminal and set an environment variable named
OKTA_CLIENT_SECRET.$ export OKTA_CLIENT_SECRET=<CLIENT_SECRET>Switch back to the Okta hc-vault configuration page. Click the user pull down menu at the top right of the Okta dashboard and copy the Okta domain.
Switch to your terminal and set an environment variable named
OKTA_DOMAIN.$ export OKTA_DOMAIN=<OKTA_DOMAIN>Switch back to the Okta hc-vault configuration page. Click the user pull down menu at the top right of the Okta dashboard and select Sign out.
Configure Vault
You have now configured your local workstation and Okta with enough sample data to start the Vault OIDC auth method configuration.
Create Vault policies
Within an organization personas with different capabilities are required to interact with the secrets stored in Vault. Each persona requires a different set of capabilities. These are expressed in policies. If you are not familiar with policies, complete the policies tutorial.
During the Okta configuration, you created two users - Thea and Bill. Thea
was added to the okta-group-vault-admins group and Bill was added to the okta-group-vault-developer
group. You will now create a policy that allows read access to the k/v secrets
engine for Bill, and a policy that allows admin/super user access for Thea.
Create the policy file named
vault-policy-developer-read.hcl.$ tee vault-policy-developer-read.hcl <<EOF # Read permission on the k/v secrets path "/secret/*" { capabilities = ["read", "list"] } EOFThis policy grants
readandlistcapabilities to all paths in the KV secrets engine enabled at thesecretpath.Create a Vault policy named
vault-policy-developer-readusing the filevault-policy-developer-read.hcl.$ vault policy write vault-policy-developer-read vault-policy-developer-read.hcl Success! Uploaded policy: vault-policy-developer-readCreate the policy file named
vault-policy-admin.hcl.$ tee vault-policy-admin.hcl <<EOF # Admin policy path "*" { capabilities = ["sudo","read","create","update","delete","list","patch"] } EOFCreate a Vault policy named
vault-policy-adminusing the filevault-policy-admin.hcl.$ vault policy write vault-policy-admin vault-policy-admin.hcl Success! Uploaded policy: vault-policy-adminList all the policies.
$ vault policy list

default
hcp-root
vault-policy-admin
vault-policy-developer-read
The
vault-policy-developer-readandvault-policy-adminpolicies are available alongside the default policies that Vault automatically creates.
Enable OIDC auth method
OIDC must be enabled and configured before it can be used.
Enable the
oidcauth method at the default path.$ vault auth enable oidc Success! Enabled oidc auth method at: oidc/The OIDC auth method is enabled at the path
oidc.Create a role named
vault-role-okta-default.$ vault write auth/oidc/role/vault-role-okta-default \ bound_audiences="$OKTA_CLIENT_ID" \ allowed_redirect_uris="$VAULT_ADDR/ui/vault/auth/oidc/oidc/callback" \ allowed_redirect_uris="http://localhost:8250/oidc/callback" \ user_claim="sub" \ token_policies="default"The
allowed_redirect_urisuse the Allowed Callback URLs defined in the Okta OIDC configuration section. Theuser_claimsets the claim to use to uniquely identify the user.Configure the
oidcauth method.$ vault write auth/oidc/config \ oidc_discovery_url="https://$OKTA_DOMAIN" \ oidc_client_id="$OKTA_CLIENT_ID" \ oidc_client_secret="$OKTA_CLIENT_SECRET" \ default_role="vault-role-okta-default"Example output:
Success! Data written to: auth/oidc/configThe
oidc_discovery_url,oidc_client_id, andoidc_client_secretare set to the variables defined in the Collect Okta configuration settings section.The
default_roleis set tovault-role-okta-default. This role and default policy provide a limited set of access to anyone authenticating via Okta.List the enabled auth methods.
$ vault auth list

Path      Type        Accessor                  Description
----      ----        --------                  -----------
oidc/     oidc        auth_oidc_99c6e954        n/a
token/    ns_token    auth_ns_token_41ec2357    token based credentials
The OIDC auth method is now enabled.
Login with OIDC
Log in with the
oidcmethod as role of avault-role-okta-default.$ vault login -method=oidc role="vault-role-okta-default"A new browser window will open. Log in as
bill@example.comand the passwordPassword1!.Click Set up for Okta Verify and follow the instructions to set up Okta Verify.
If Okta times out while you set up Okta Verify, return to the terminal and log in again.
Example output:
Complete the login via your OIDC provider. Launching browser to:

https://<youroktaurl>.okta.com/oauth2/v1/authorize?client_id=0oa49ktuo8SwLMNOP7&code_challenge=KjgG1w8Jn1ISUvOwz0B6ttqQvPD6GxRuRHIJKLMNOSA&code_challenge_method=S256&nonce=n_8nHzOTkMJkDqUZlYuQA8&redirect_uri=http%3A%2F%2Flocalhost%3A8250%2Foidc%2Fcallback&response_type=code&scope=openid&state=st_CqJh1giiQ3DGDUtJJycS

WARNING! The VAULT_TOKEN environment variable is set! This takes precedence
over the value set by this command. To use the value set by this command,
unset the VAULT_TOKEN environment variable or set it to the token displayed
below.

Success! You are now authenticated. The token information displayed below
is already stored in the token helper. You do NOT need to run "vault login"
again. Future Vault requests will automatically use this token.

Key                  Value
---                  -----
token                hvs.Q6BTVufoPaw5EoHIJKL4c9Em.uRvAl
token_accessor       uciNV8ZBaUPdrkLMNOPYLS4.uRvAl
token_duration       1h
token_renewable      true
token_policies       ["default"]
identity_policies    []
policies             ["default"]
token_meta_role      vault-role-okta-default
You were able to authenticate using Okta and received the
defaultpolicy which provides limited access to Vault.If you receive an error message, please refer to the Troubleshooting section at the end of this tutorial.

Create an external Vault group
To assign different policies to different users based on their Okta group membership you will now configure Vault to match the Okta group membership of the user and assign a more permissive Vault role and policy.
Create a role named
vault-role-okta-group-vault-developer.$ vault write auth/oidc/role/vault-role-okta-group-vault-developer \ bound_audiences="$OKTA_CLIENT_ID" \ allowed_redirect_uris="$VAULT_ADDR/ui/vault/auth/oidc/oidc/callback" \ allowed_redirect_uris="http://localhost:8250/oidc/callback" \ user_claim="sub" \ token_policies="default" \ oidc_scopes="groups" \ groups_claim="groups"This role is defined similarly to the previously created role. The
defaultpolicy is assigned to the token. Additional policies are assigned through any groups that the user claims to belong. Thegroups_claimfield defines the value ofgroups. This value is the key in the ID token.Create an external group, named
okta-group-vault-developerwith thevault-policy-developer-readpolicy.$ vault write identity/group name="okta-group-vault-developer" type="external" \ policies="vault-policy-developer-read" \ metadata=responsibility="okta-group-vault-developer"Example output:
Key     Value
---     -----
id      1713c9c1-42c1-de6a-5d13-44f7c06f113f
name    okta-group-vault-developer
Create a variable named
GROUP_IDto store theidof theokta-group-vault-developergroup.$ GROUP_ID=$(vault read -field=id identity/group/name/okta-group-vault-developer)Create a variable named
OIDC_AUTH_ACCESSORto store the accessor of theoidcauthentication method.$ OIDC_AUTH_ACCESSOR=$(vault auth list -format=json | jq -r '."oidc/".accessor')This displays all authentication methods in JSON and then parses that list, through
jq, to extract theaccessorfield of theoidcauthentication method.Create a group alias named
okta-group-vault-developer.$ vault write identity/group-alias name="okta-group-vault-developer" \ mount_accessor="$OIDC_AUTH_ACCESSOR" \ canonical_id="$GROUP_ID"Example output:
Key             Value
---             -----
canonical_id    5417a83d-4df6-2a3d-0f3e-f1a3e79cd187
id              933df803-c174-58ab-3dde-3e71a9a223a9
The
okta-group-vault-developerVault group alias connects theoidcauthentication method and theokta-group-vault-developerVault group with thevault-policy-developer-readpolicy.Log in with the
oidcmethod as role of avault-role-okta-group-vault-developer.$ vault login -method=oidc role="vault-role-okta-group-vault-developer" Complete the login via your OIDC provider. Launching browser to: https://<youroktaurl>.okta.com/oauth2/v1/authorize?client_id=0oa4e2310bkQSHsUO5d7&code_challenge=cv9SljXoZuIZyWoSnueacarQNCxMiBkbu_bQ8TgqOBM&code_challenge_method=S256&nonce=n_Su1rUN67CCE1vbqnFvT8&redirect_uri=http%3A%2F%2Flocalhost%3A8250%2Foidc%2Fcallback&response_type=code&scope=openid+groups&state=st_KvZmAniXE8ho86R1NT6f WARNING! The VAULT_TOKEN environment variable is set! This takes precedence over the value set by this command. To use the value set by this command, unset the VAULT_TOKEN environment variable or set it to the token displayed below. Success! You are now authenticated. The token information displayed below is already stored in the token helper. You do NOT need to run "vault login" again. Future Vault requests will automatically use this token. Key Value --- ----- token s.i2iYpiAtgjBWzw7VdZiXlf45.6XHz9 token_accessor XMRLItHWKNvqZCEJCEQwQXkd.6XHz9 token_duration 1h token_renewable true token_policies ["default"] identity_policies ["vault-policy-developer-read"] policies ["default" "vault-policy-developer-read"] token_meta_role vault-role-okta-group-vault-developerThe returned token inherits the
defaultpolicy and is assigned thevault-policy-developer-readpolicy because the valueokta-group-vault-developermatches the Okta group the user is assigned. The browser session inherited the previous Okta login for the userbill@example.com.If you receive an error message, please refer to the Troubleshooting section at the end of this tutorial.
Because you will be logging in as a new user to demonstrate different policies being used for different groups you need to log out of the Okta session in your browser.
Navigate to your Okta domain. You can retrieve this from the Okta dashboard or run
echo $OKTA_DOMAINto retrieve the environment variable. You should be automatically logged into the My Apps page for the userbill@example.com. Click on bill in the top right corner of the page and then click Sign out.Create a role named
vault-role-okta-group-vault-admins.$ vault write auth/oidc/role/vault-role-okta-group-vault-admins \ bound_audiences="$OKTA_CLIENT_ID" \ allowed_redirect_uris="$VAULT_ADDR/ui/vault/auth/oidc/oidc/callback" \ allowed_redirect_uris="http://localhost:8250/oidc/callback" \ user_claim="sub" \ token_policies="default" \ oidc_scopes="groups" \ groups_claim="groups"Create an external group, named
okta-group-vault-adminswith thevault-policy-adminpolicy.$ vault write identity/group name="okta-group-vault-admins" type="external" \ policies="vault-policy-admin" \ metadata=responsibility="okta-group-vault-admins"Example output:
Key     Value
---     -----
id      1713c9c1-42c1-de6a-5d13-44f7c06f113f
name    okta-group-vault-admins
Create a variable named
GROUP_IDto store theidof theokta-group-vault-adminsgroup.$ GROUP_ID=$(vault read -field=id identity/group/name/okta-group-vault-admins)Create a variable named
OIDC_AUTH_ACCESSORto store the accessor of theoidcauthentication method.$ OIDC_AUTH_ACCESSOR=$(vault auth list -format=json | jq -r '."oidc/".accessor')Create a group alias named
okta-group-vault-admins.$ vault write identity/group-alias name="okta-group-vault-admins" \ mount_accessor="$OIDC_AUTH_ACCESSOR" \ canonical_id="$GROUP_ID"Example output:
Key             Value
---             -----
canonical_id    c255f65d-8828-6bd6-43d4-d51558b5af55
id              ebe3d072-3942-b085-3a2c-65ac8e1904e8
The
okta-group-vault-adminsgroup alias connects theoidcauthentication method and thevault-group-adminsgroup with thevault-policy-adminpolicy.Log in with the
oidcmethod as role of avault-role-okta-group-vault-admins.$ vault login -method=oidc role="vault-role-okta-group-vault-admins"A new browser window will open. Log in as
thea@example.comand the passwordPassword1!.Click Set up for Okta Verify and follow the instructions to set up Okta Verify.
Example output:
Complete the login via your OIDC provider. Launching browser to:

    https://<youroktaurl>.okta.com/oauth2/v1/authorize?client_id=0oa4e2310bkQSHsUO5d7&code_challenge=Gt_sFmEEET1ecuuxNJCUbGx4dzYPn-s25sXz0sPGq8I&code_challenge_method=S256&nonce=n_fQvQ39jUYFrglTUTD1bU&redirect_uri=http%3A%2F%2Flocalhost%3A8250%2Foidc%2Fcallback&response_type=code&scope=openid+groups&state=st_XB9OQNfAWVDTldI4zpkq

WARNING! The VAULT_TOKEN environment variable is set! This takes precedence
over the value set by this command. To use the value set by this command,
unset the VAULT_TOKEN environment variable or set it to the token displayed
below.

Success! You are now authenticated. The token information displayed below
is already stored in the token helper. You do NOT need to run "vault login"
again. Future Vault requests will automatically use this token.

Key                  Value
---                  -----
token                s.SlzaIGkaYeuzHTTLwb1j3DVu.6XHz9
token_accessor       jmuZQsNJcH8l7S08F1rM1V82.6XHz9
token_duration       1h
token_renewable      true
token_policies       ["default"]
identity_policies    ["vault-policy-admin"]
policies             ["default" "vault-policy-admin"]
token_meta_role      vault-role-okta-group-vault-admins
The returned token inherits the
defaultpolicy and is assigned thevault-policy-adminpolicy because the valueokta-group-vault-adminsmatches the Okta group the user is assigned.If you receive an error message, please refer to the Troubleshooting section at the end of this tutorial.
Troubleshooting
When configuring OIDC, configuration settings must be configured as documented, otherwise you may experience errors when authenticating. Below are some common error messages and how to troubleshoot them.
400

Bad Request

Your request resulted in an error. User is not assigned to the client application.
Problem: This error can occur if the Okta group is not assigned to the hc-vault application.
Troubleshooting steps:
Log into Okta as an administrator and navigate to Applications > Applications.
Click on the hc-vault application.
Click on the Assignments tab.
Click on the Assign button and select Assign to Groups.
Assign the missing group to the application.
Click the Done button.
Log out and attempt to login in again.
Error authenticating: Error making API request.

Namespace: admin/
URL: GET https:/<yourvaultdomain>:8200/v1/auth/oidc/oidc/callback?client_nonce=grOGC4BQQfBiPyp3u2Ke&code=rsGK0Wza8MNTEGSAj02dfmb1Gn9qfCCpWLPZHEKSbB0&id_token=&state=st_1YRKVLiTrbwiLOVjlmEU
Code: 400. Errors:

* Vault login failed. Error exchanging oidc code: "Provider.Exchange: unable to exchange auth code with provider: oauth2: cannot fetch token: 401 Unauthorized\nResponse: {\"error\":\"invalid_client\",\"error_description\":\"The client secret supplied for a confidential client is invalid.\"}".

Problem: Client ID or client secret from Okta does not match config for the Vault role.
echo $OKTA_CLIENT_ID
Problem: This error can occur if the configuration for the Vault OIDC provider does not match the configuration provided by Okta.
Troubleshooting steps:
Check the Okta client ID.
echo $OKTA_CLIENT_IDVerify it matches the client ID from the Okta admin portal > Applications > Applications > hcp-vault.
Check the Okta client secret.
echo $OKTA_CLIENT_SECRETVerify it matches the client ID from the Okta admin portal > Applications > Applications > hcp-vault.
Check the Okta domain.
echo $OKTA_DOMAINVerify it matches the client ID from the Okta admin portal > Applications > Applications > hcp-vault.
Error authenticating: Error making API request

Namespace: admin/
URL: GET https://<yourvaultdomain>:8200/v1/auth/oidc/oidc/callback?client_nonce=LKJDKLSJLKJFKLD<snip>_token=&state=st_klasjflkasjflkdas
Code: 400. Errors: failed to fetch groups" "groups" claim not found in token
Problem: This error can occur for several reasons. The most common is you are logged into your Okta domain with a user that is not assigned to the hcp-vault application or assigned to one of the groups.
For example, you may be logged into your Okta domain as bill@example.com and trying to login
in as with okta-group-vault-admins group which Bill is not a member of, or you are logged in as an Okta
administrator user that was performing the OIDC configuration but trying to log in to Vault with
the OIDC auth method.
Troubleshooting steps:
Verify you are not logged into Okta by opening a browser tab and navigating to
https://<youroktadomain>.okta.com.If you are presented with a login form, proceed to the next step. If you are logged into Okta, click the user menu in the top right and select Sign out.
To verify your claims are setup properly, log into Okta as an administrator and navigate to Security > API and click on the default authorization server.
Click the Token preview tab. Fill in the Request Properties tab as follows:
- OAuth/OIDC client: hcp-vault (type, then click the tile when it appears)
- Grant type: Implicit (hybrid)
- User:
Thea Example (thea@example.com)(type, the click the tile when it appears) - Response type: id_token
- Scopes:
profile(type, then click the tile when it appears),openid(type, then click the tile when it appears)
Click the Preview Token button.
The "Payload" section should display JSON that includes the groups key.
"groups": [
   "okta-group-vault-admins"
   ]
If the groups claim appears, you may have not included the claim in the okta role configuration, or you may have duplicate applications with the same name.
Cleanup
To avoid any additional charges or access to your accounts you should consider following:
- Delete any Vault Dedicated clusters used only for this tutorial.
- Delete the Okta users
thea@example.comandbill@example.com. - Delete the
hc-vaultOkta application. - Delete the
groupsclaim added to the default Okta authorization server. - Unset the
OKTA_DOMAIN,OKTA_CLIENT_ID, andOKTA_CLIENT_SECRETenvironment variables. - Unset the
VAULT_ADDR,VAULT_NAMESPACE, andVAULT_TOKENenvironment variables for any deleted/unused Vault Dedicated clusters.
Next steps
In this tutorial, you learned how to create Okta groups and update the default authorization server to include a user's group membership in the ID Token, create and configure a new Okta application integration to support OpenID Connect, and configured Vault Dedicated to authenticate users and assign unique policies to users based on their Okta group membership.
To learn more about other auth methods, refer to the Auth Methods tutorial collection.