Vault Agent and Vault Proxy quick start
Adopting a new tool can be challenging for an growing organization. Common challenges include resistance to change, lack of expertise, integration complexities, and ensuring proper training. Vault Agent and Vault Proxy simplify and streamline the integration of applications with HashiCorp Vault, making secrets management more efficient and user-friendly.
Vault Agent simplifies secrets management by acting as a client-side daemon. It handles authentication, secret retrieval, and caching for applications, reducing the need for application code changes and improving security. It allows applications to access secrets without needing direct integration with Vault, making it easier to adopt Vault in existing environments.
Vault Proxy simplifies integrating applications with HashiCorp Vault by acting as an API proxy, handling authentication, token renewal, and caching. It allows applications to access Vault secrets without needing direct integration with Vault, potentially easing the initial hurdle to adoption.
Both tools help streamline the adoption of HashiCorp Vault, making it easier to secure sensitive data without significant application refactoring.
What is Vault Agent?
Vault Agent behaves as a client-side daemon to make requests to Vault on behalf of the client application. This includes the authentication to Vault.
Vault clients (human users, applications, etc.) must authenticate with Vault and get a client token to make API requests. Because tokens have time-to-live (TTL), the clients must renew the token's TTL or re-authenticate to Vault based on its TTL. Vault Agent authenticates with Vault and manages the token's lifecycle so that the client application doesn't have to.
In addition, you can inject Consul Template markup into Vault Agent to render secrets into files where the client application loads data from.


This eliminates the need to change your application code to invoke the Vault API. Your existing applications can remain Vault-unaware.
Prerequisites
To complete this tutorial, you need to install the Vault binary.
Launch Terminal
This tutorial includes a free interactive command-line lab that lets you follow along on actual cloud infrastructure.

Lab setup
Launch the HCP Portal and login.
Click Vault in the left navigation pane.
In the Vault clusters pane, click vault-cluster.
Under Cluster URLs, click Public Cluster URL.
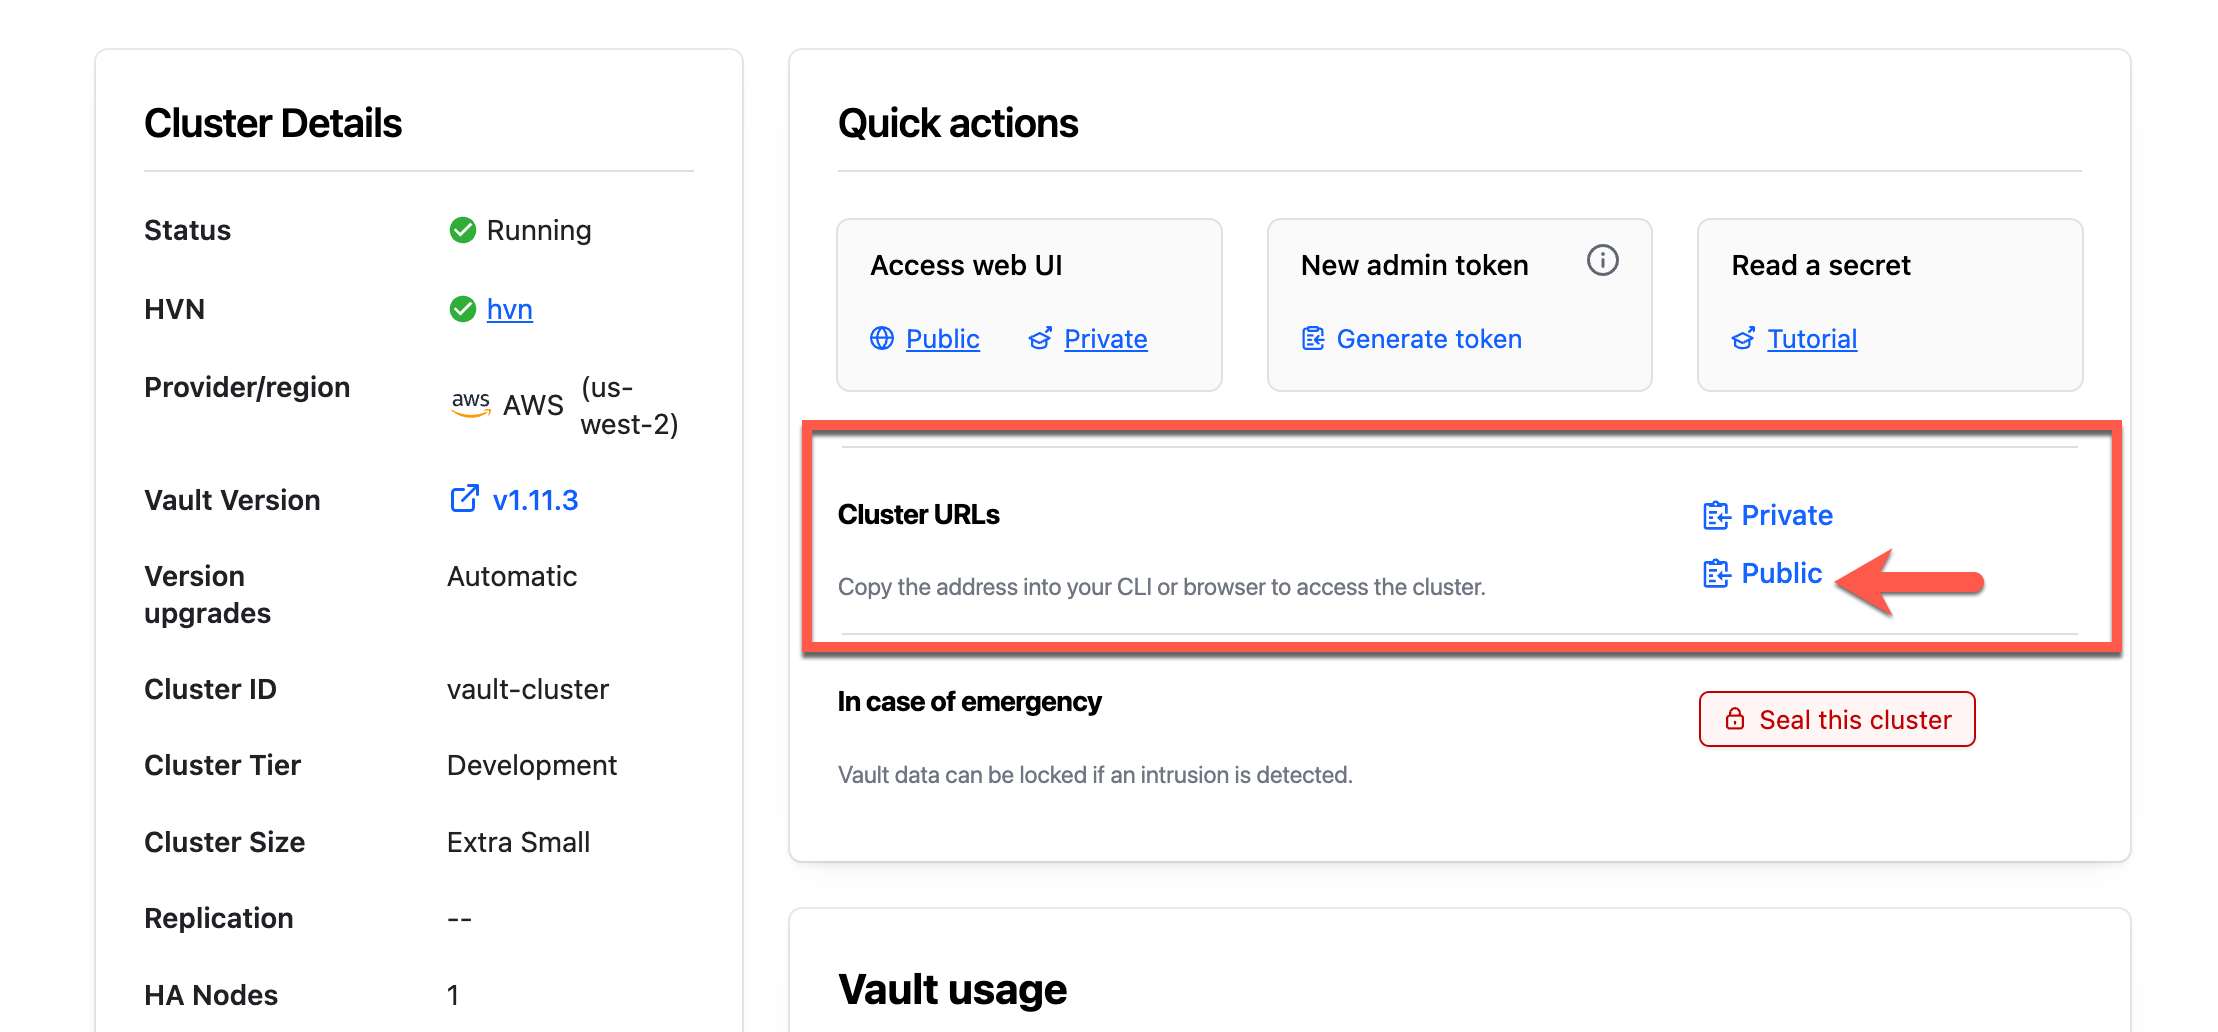
In a terminal, set the
VAULT_ADDRenvironment variable to the copied address.$ export VAULT_ADDR=<Public_Cluster_URL>Return to the Overview page and click Generate token.
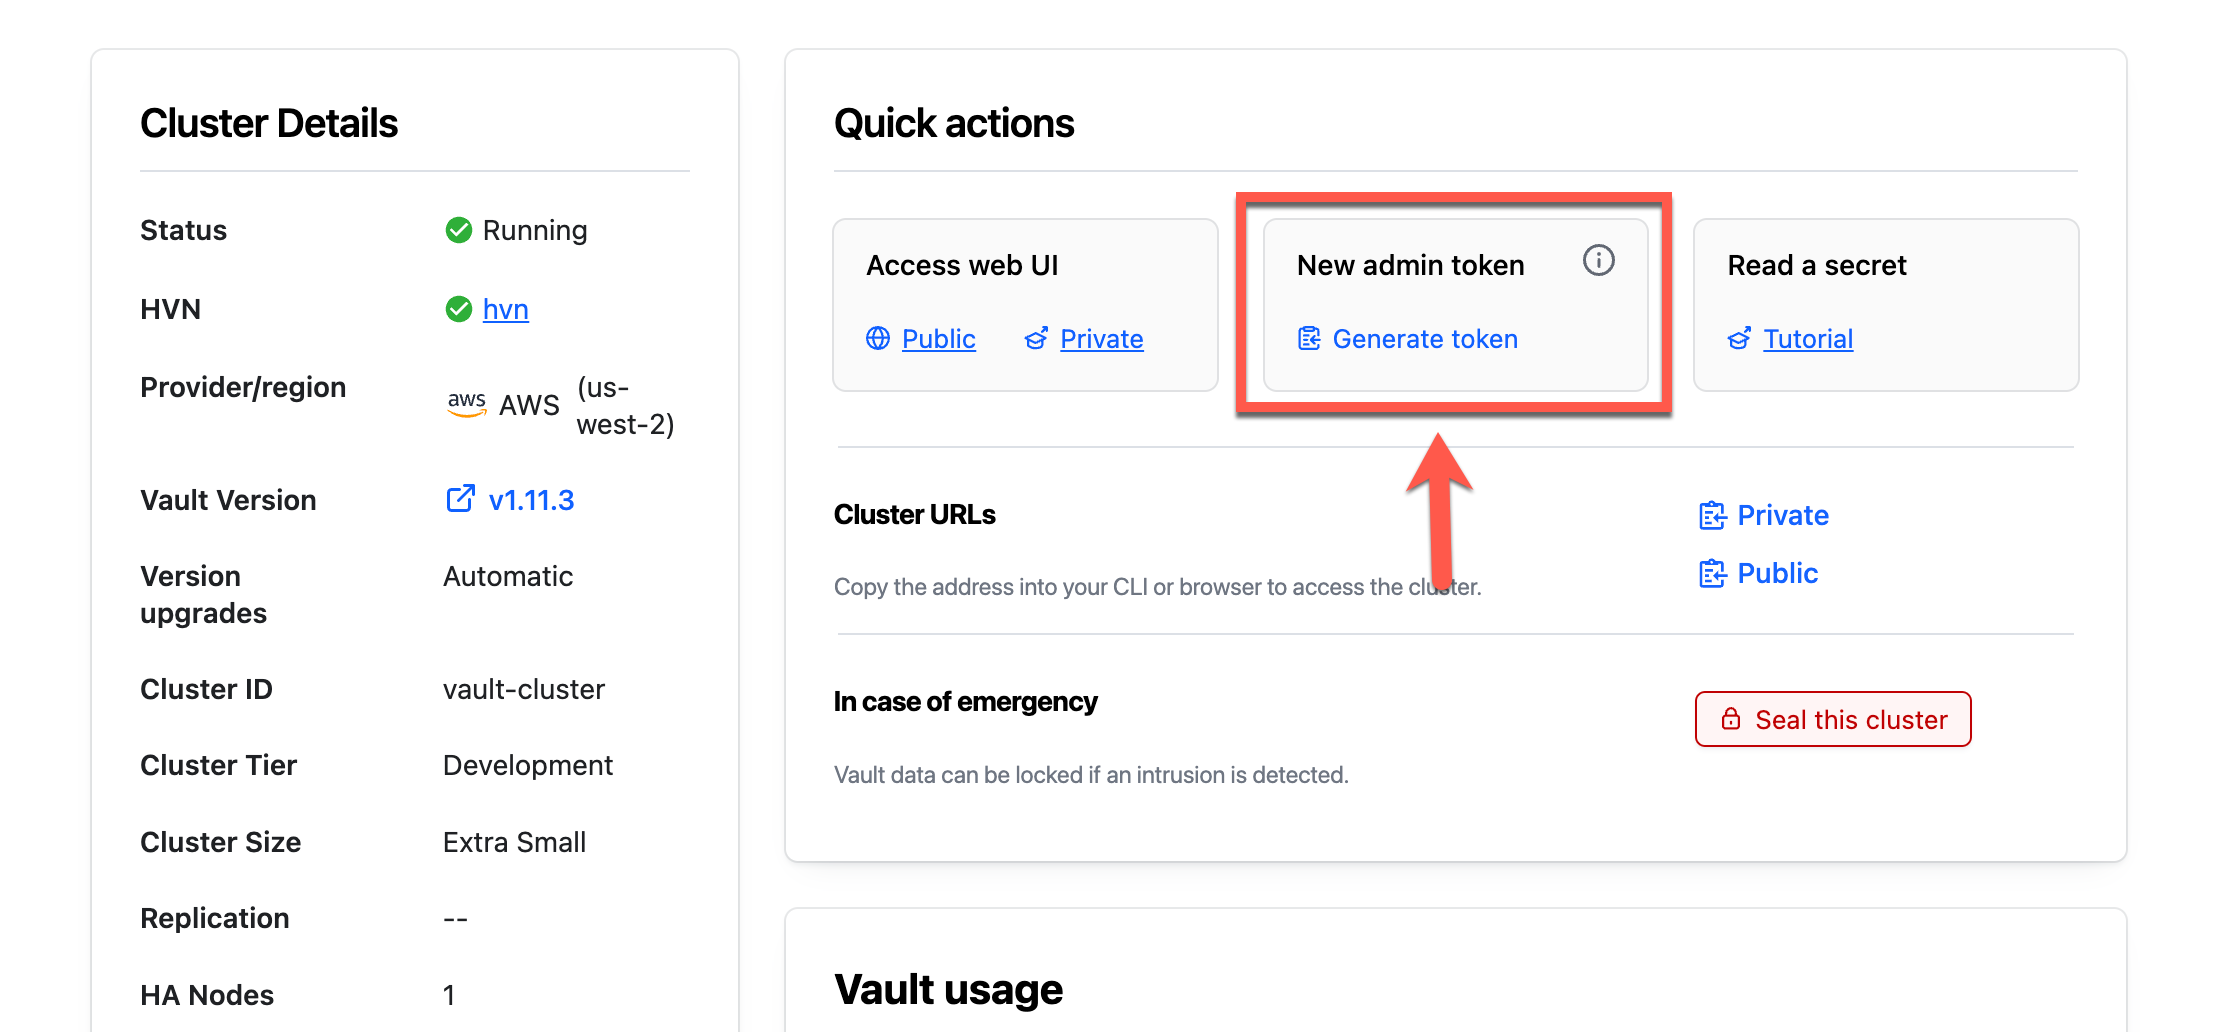
Copy the Admin Token.
Return to the terminal and set the
VAULT_TOKENenvironment variable.$ export VAULT_TOKEN=<token>Set the
VAULT_NAMESPACEenvironment variable toadmin.$ export VAULT_NAMESPACE=adminThe
adminnamespace is the top-level namespace automatically created by HCP Vault. All CLI operations default to use the namespace defined in this environment variable.Log in to HCP Vault Dedicated.
$ vault login $VAULT_TOKEN WARNING! The VAULT_TOKEN environment variable is set! The value of this variable will take precedence; if this is unwanted please unset VAULT_TOKEN or update its value accordingly. Success! You are now authenticated. The token information displayed below is already stored in the token helper. You do NOT need to run "vault login" again. Future Vault requests will automatically use this token. Key Value --- ----- token hvs.CAESIGFwyvuxqc319bArV9jVMV_3gZH3OV434JYu8niYpDRRGigKImh2cy5oRjlaWVhtYWtBN1U1QUV4cnpZV1Bjb2kuWDhXaDIQyIAM token_accessor Ri7jMehrYjAWvnN7EufsRX9O.X8Wh2 token_duration 5h56m42s token_renewable false token_policies ["default" "hcp-root"] identity_policies [] policies ["default" "hcp-root"]Enable Key/Value v2 secrets engine at
secret/.$ vault secrets enable -path=secret kv-v2 Success! Enabled the kv-v2 secrets engine at: secret/
Create a working directory
Create a directory where you generate test files.
$ mkdir $HOME/vault-test && cd $HOME/vault-testYou will read the created secrets using Vault Agent.
Create test data
Create a mock data file.
$ tee data.json -<<EOF
{
   "organization": "ACME Inc.",
   "customer_id": "ABXX2398YZPIE7391",
   "region": "US-West",
   "zip_code": "94105",
   "type": "premium",
   "contact_email": "james@acme.com",
   "status": "active"
}
EOF
Create the mock data in the KV v2 secrets engine.
$ vault kv put secret/customers/acme @data.json

======= Secret Path =======
secret/data/customers/acme

======= Metadata =======
Key                Value
---                -----
created_time       2023-02-23T16:25:46.030960819Z
custom_metadata    <nil>
deletion_time      n/a
destroyed          false
version            1
Start a Vault Agent
Start a Vault Agent instance that connects to the Vault server running at
VAULT_ADDR.
Create the Vault Agent configuration file.
$ tee agent-config.hcl -<<EOF
pid_file = "./pidfile"

vault {
   address = "$VAULT_ADDR"
   tls_skip_verify = true
}

auto_auth {
   method {
      type = "token_file"
      namespace = "$VAULT_NAMESPACE"
      config = {
         token_file_path = "$HOME/.vault-token"
      }
   }
   sink "file" {
      config = {
            path = "$HOME/vault-token-via-agent"
      }
   }
}
EOF
Start a Vault Agent.
$ vault agent -config=agent-config.hclExample output:
==> Vault Agent started! Log data will stream in below:

==> Vault Agent configuration:

                     Cgo: disabled
               Log Level:
               Version: Vault v1.13.0, built 2023-02-14T14:25:23Z
            Version Sha: c2d6b060c0eec60393e866b761a5990716cb45de

[INFO]  vault-agent.sink.file: creating file sink
[INFO]  vault-agent.sink.file: file sink configured: path=$HOME/vault-token-via-agent mode=-rw-r-----
[INFO]  vault-agent.template.server: starting template server
[INFO]  vault-agent.template.server: no templates found
[INFO]  vault-agent.auth.handler: starting auth handler
[INFO]  vault-agent.auth.handler: authenticating
[INFO]  vault-agent.sink.server: starting sink server
...snip...
At this point, you still need to change your client application to make Vault
requests targeting VAULT_ADDR using the Vault token stored in the sink
location ($HOME/vault-token-via-agent).
Next, explore other Vault Agent features.
Define Vault Agent template
In the following scenario, the client application loads data read from customer.json.
Press Ctrl + C to stop the running Vault Agent.
Create a
customer.json.tmplfile.$ tee customer.json.tmpl -<<EOF { {{ with secret "secret/data/customers/acme" }} "Organization": "{{ .Data.data.organization }}", "ID": "{{ .Data.data.customer_id }}", "Contact": "{{ .Data.data.contact_email }}" {{ end }} } EOFCreate a Vault Agent configuration file with a
templatestanza.$ tee agent-template.hcl -<<EOF template { source = "$HOME/vault-test/customer.json.tmpl" destination = "$HOME/vault-test/customer.json" } EOFStart Vault Agent again with the additional configuration applied.
$ vault agent -config=agent-config.hcl \
   -config=agent-template.hcl
Example output:
==> Vault Agent started! Log data will stream in below:

==> Vault Agent configuration:

         Api Address 1: http://bufconn
                     Cgo: disabled
               Log Level:
               Version: Vault v1.13.0-rc1+ent, built 2023-02-14T14:25:23Z
            Version Sha: c2d6b060c0eec60393e866b761a5990716cb45de

[INFO]  vault-agent.sink.file: creating file sink
[INFO]  vault-agent.sink.file: file sink configured: path=$HOME/vault-token-via-agent mode=-rw-r-----
[INFO]  vault-agent.auth.handler: starting auth handler
[INFO]  vault-agent.auth.handler: authenticating
[INFO]  vault-agent.template.server: starting template server
...snip...
[INFO] (runner) starting
[INFO] (runner) rendered "$HOME/vault-test/customer.json.tmpl" => "$HOME/vault-test/customer.json"
Open a new browser or text editor and verify that the
customer.jsonfile has the secrets retrieved from Vault.$ cat customer.jsonExample output:
   {

   "Organization": "ACME Inc.",
   "ID": "ABXX2398YZPIE7391",
   "Contact": "james@acme.com"

}
This should match the data stored in
secret/.$ vault kv get secret/customers/acme ======= Secret Path ======= secret/data/customers/acme ======= Metadata ======= Key Value --- ----- created_time 2023-02-23T16:25:46.030960819Z custom_metadata <nil> deletion_time n/a destroyed false version 1 ======== Data ======== Key Value --- ----- contact_email james@acme.com customer_id ABXX2398YZPIE7391 organization ACME Inc. region US-West status active type premium zip_code 94105If the template fails, make sure to set the
VAULT_NAMESPACEvariable.$ echo $VAULT_NAMESPACE admin
The client application loads data from the customer.json file.
By leveraging the Vault Agent Template feature, you did not have to make any
code changes to the client application while you manage secrets with Vault.
Vault Agent logs
You can specify the behavior of Vault Agent logging using a command flag, environment variable, or configuration parameters.
Start Vault Agent with the
-log-filecommand flag which defines the prefix for the log file.$ vault agent -config=agent-config.hcl \ -log-file=$HOME/vault-test/vault-agent.logThe command generates a log file named
$HOME/vault-test/vault-agent.log.Verify the generated log file.
$ ls | grep .log
vault-agent.log
You can open the file to verify its content.
$ cat vault-agent.log

[INFO]  vault-agent.sink.file: creating file sink
[INFO]  vault-agent.sink.file: file sink configured: path=/Users/yoko/vault-token-via-agent mode=-rw-r-----
[INFO]  vault-agent.template.server: starting template server
[INFO]  vault-agent.template.server: no templates found
[INFO]  vault-agent.auth.handler: starting auth handler
[INFO]  vault-agent.sink.server: starting sink server
[INFO]  vault-agent.auth.handler: authenticating
[INFO]  vault-agent.auth.handler: authentication successful, sending token to sinks
...snip...
Vault Proxy
Vault Proxy acts as a proxy between Vault and its client applications. See the Vault Agent and Vault Proxy documentation page for more details about feature parity between Vault Agent and Vault Proxy.


Vault Proxy provides auto-auth, caching, and API proxy functionality.
| Capability | Vault Agent | Vault Proxy |
|---|---|---|
| Auto-auth to authenticate with Vault | ✅ | ✅ |
| Run as a Windows Service | ✅ | ✅ |
| Caching the newly created tokens and leases | ✅ | ✅ |
| Templating to render user-supplied templates | ✅ | ❌ |
| Process supervisor for injecting secrets as environment variables into a process | ✅ | ❌ |
| API proxy to act as a proxy for Vault API | Deprecated | ✅ |
| Static secret caching for KV secrets | ❌ | ✅ |
The vault and auto_auth stanzas in the Vault Proxy and Vault Agent
configurations are identical; however, you must define listener and
api_proxy stanzas for Vault Proxy.
Example configuration for Vault Proxy:
vault-proxy-config.hcl
pid_file = "./pidfile"

vault {
   address = "http://127.0.0.1:8200"
   tls_skip_verify = true
}

auto_auth {
   method {
      type = "token_file"
      config = {
         token_file_path = "$HOME/.vault-token"
      }
   }
   sink "file" {
      config = {
            path = "$HOME/vault-proxy"
      }
   }
}

listener "tcp" {
   address     = "127.0.0.1:8100"
   tls_disable = true
}

api_proxy {
   use_auto_auth_token = true
   enforce_consistency = "always"
}

cache {
   cache_static_secrets = true
   static_secret_token_capability_refresh_interval = "5m"
}
Start a Vault Proxy
You can define an API endpoint for the client application to send requests to
rather than VAULT_ADDR.
Press Ctrl + C to stop the running Vault Agent.
Create a file that defines the
listenerstanza andapi_proxystanza.$ tee vault-proxy-config.hcl -<<EOF pid_file = "./pidfile" vault { address = "$VAULT_ADDR" tls_skip_verify = true } auto_auth { method { type = "token_file" namespace = "$VAULT_NAMESPACE" config = { token_file_path = "$HOME/.vault-token" } } sink "file" { config = { path = "$HOME/vault-token-via-agent" } } } listener "tcp" { address = "127.0.0.1:8100" tls_disable = true } api_proxy { use_auto_auth_token = true enforce_consistency = "always" } cache { cache_static_secrets = true static_secret_token_capability_refresh_interval = "5m" } EOFThis configuration creates a listener endpoint on the loop-back interface
127.0.0.1:8100. You can add multiplelistenerstanzas. See the Vault Proxy documentation for more information.The
api_proxystanza enables theuse_auto_auth_tokenparameter. When enabled, proxied requests do not need to set theX-Vault-TokenHTTP header. Request will use the auto-auth token by default.Set the
cache_static_secretsparameter in thecachestanza to true to enable the static secrets caching feature. This enables Vault Proxy to cache static secrets read from the KV v1 and KV v2 secrets engines.Note that the persistent caching feature available in Vault Community Edition is only supported in Kubernetes environments and does not cache static secrets.
Start the Vault Proxy.
$ vault proxy -config=vault-proxy-config.hclVault Proxy is now listening to the proxy addresses
http://127.0.0.1:8100.==> Vault Proxy started! Log data will stream in below: ==> Vault Proxy configuration: Api Address 1: http://127.0.0.1:8100 Cgo: disabled Log Level: Version: Vault v1.16.0, built 2024-02-12T16:07:06Z Version Sha: 2ca8655bfeb501c0937240df2828ef0fb7c78de1Open another command terminal and send an API request to the Vault Proxy.
Read the secrets at
secret/customers/acmevia the proxy address.This example uses jq to process the JSON output for readability.
$ curl -s http://127.0.0.1:8100/v1/secret/data/customers/acme \
   | jq -r ".data.data"
Output:
{
   "contact_email": "james@acme.com",
   "customer_id": "ABXX2398YZPIE7391",
   "organization": "ACME Inc.",
   "region": "US-West",
   "status": "active",
   "type": "premium",
   "zip_code": "94105"
}
A token was automatically attached to the request by the Vault Proxy because you set the
use_auto_auth_tokenparameter totruein the configuration.
Static secret caching
Exit the Vault Proxy and Vault community edition process by pressing Ctrl + C.
Update the
vault-proxy-config.hclto setcache_static_secretstotruein thecachestanza.vault-proxy-config.hcl
cache {
   cache_static_secrets = true
   static_secret_token_capability_refresh_interval = "5m"
}
Open a terminal and export an environment variable with a valid Vault Enterprise license.
$ export VAULT_LICENSE=0S3ASM3STC0OKI3....Reset the VULT_ADDR and VAULT_TOKEN environment variables.
$ export VAULT_ADDR=http://127.0.0.1:8200Login to Vault again.
$ vault login rootIn the same terminal start a Vault Enterprise dev server with
rootas the root token value.$ vault server -dev -dev-root-token-id rootOpen a terminal and start the Vault Proxy with the static secret caching feature.
$ vault proxy -config=vault-proxy-config.hclResetting Vault Enterprise dev server cleaned out the preexisting secrets. Create a new secret.
$ vault kv put secret/customers/acme @data.jsonRead the secrets twice. Vault Proxy caches the secret when you first access it. The second time you access the secret, Vault proxy returns the cached secret.
$ curl --verbose -s http://127.0.0.1:8100/v1/secret/data/customers/acme \
   | jq -r ".data.data"
Use the
--verboseor-voption with the cURL command so that you can see more detail.* Trying 127.0.0.1:8100... * Connected to 127.0.0.1 (127.0.0.1) port 8100 > GET /v1/secret/data/customers/acme HTTP/1.1 > Host: 127.0.0.1:8100 > User-Agent: curl/8.4.0 > Accept: */* > < HTTP/1.1 200 OK < Age: 65 < Cache-Control: no-store < Content-Length: 483 < Content-Type: application/json < Date: Tue, 20 Feb 2024 19:28:17 GMT < Strict-Transport-Security: max-age=31536000; includeSubDomains < X-Cache: HIT < { [483 bytes data] * Connection #0 to host 127.0.0.1 left intact { "contact_email": "james@acme.com", "customer_id": "ABXX2398YZPIE7391", "organization": "ACME Inc.", "region": "US-West", "status": "active", "type": "premium", "zip_code": "94105" }Notice that the
X-CacheisHIT.Update the secrets to see what happens.
$ vault kv patch secret/customers/acme "customer_since"="2011"Read the secrets again via proxy.
$ curl --verbose http://127.0.0.1:8100/v1/secret/data/customers/acme \
   | jq -r ".data.data"
The
Agevalue changed since the secrets were just updated.* Trying 127.0.0.1:8100... * Connected to 127.0.0.1 (127.0.0.1) port 8100 > GET /v1/secret/data/customers/acme HTTP/1.1 > Host: 127.0.0.1:8100 > User-Agent: curl/8.4.0 > Accept: */* > < HTTP/1.1 200 OK < Age: 8 < Cache-Control: no-store < Content-Length: 506 < Content-Type: application/json < Date: Tue, 20 Feb 2024 19:29:21 GMT < Strict-Transport-Security: max-age=31536000; includeSubDomains < X-Cache: HIT < { [506 bytes data] * Connection #0 to host 127.0.0.1 left intact { "contact_email": "james@acme.com", "customer_id": "ABXX2398YZPIE7391", "customer_since": "2011", "organization": "ACME Inc.", "region": "US-West", "status": "active", "type": "premium", "zip_code": "94105" }Back in the terminal with the proxy running, press Ctrl + C to stop the running Vault Proxy.
Self-healing tokens
Auto-auth is responsible for authenticating with Vault to obtain a client token, storing it, and managing its lifecycle. Vault Agent and Vault Proxy's auto-auth capabilities can recover from invalid token errors, such as those caused by unexpected events like a Vault administrator revoking the client token in use.
Test the self-healing capability
Create a script to setup
approleauth method.$ tee setup-approle.sh -<<EOF ## Create a policy named "read-only" vault policy write read-only -<<EOL path "secret/*" { capabilities = ["read", "list"] } EOL ## Enable and configure approle auth method vault auth enable approle vault write auth/approle/role/read-only policies=read-only token_num_uses=5 ## Retrive role ID and secret ID vault read -field=role_id auth/approle/role/read-only/role-id > $HOME/vault-test/roleID.txt vault write -f -field=secret_id auth/approle/role/read-only/secret-id > $HOME/vault-test/secretID.txt EOFThis script:
- Creates a policy named
read-onlywhich allows read and list operations against paths starts withsecret/. - Enables
approleauth method. - Creates a role named
read-onlywhich has the read-only policy attached. The token for this role has a use limit of 5. - Retrieves the role ID for the
read-onlyrole and store the value in theroleID.txtfile. - Retrieves the secret ID and store the value in the
secretID.txtfile.
- Creates a policy named
Make the script executable.
$ chmod +x setup-approle.shRun the script to setup an
approleauth method.$ ./setup-approle.sh Success! Uploaded policy: read-only Success! Enabled approle auth method at: approle/ Success! Data written to: auth/approle/role/read-onlyCreate a new Vault Proxy configuration which uses
approleauth method.$ tee vault-proxy-config-2.hcl -<<EOF pid_file = "./pidfile" vault { address = "$VAULT_ADDR" tls_skip_verify = true } auto_auth { method { type = "approle" config = { role_id_file_path = "$HOME/vault-test/roleID.txt" secret_id_file_path = "$HOME/vault-test/secretID.txt" } } sink "file" { config = { path = "$HOME/vault-token-via-agent" } } } listener "tcp" { address = "127.0.0.1:8100" tls_disable = true } api_proxy { use_auto_auth_token = true enforce_consistency = "always" } EOFStart a Vault Proxy.
$ vault proxy -config=vault-proxy-config-2.hclFrom another command terminal, read the secrets through the proxy.
$ curl -s http://127.0.0.1:8100/v1/secret/data/customers/acme \
   | jq -r ".data.data"
The command returns the secrets.
{
   "contact_email": "james@acme.com",
   "customer_id": "ABXX2398YZPIE7391",
   "organization": "ACME Inc.",
   "region": "US-West",
   "status": "active",
   "type": "premium",
   "zip_code": "94105"
}
Revoke the token stored in the
sinklocation.$ vault token revoke $(cat $HOME/vault-token-via-agent) Success! Revoked token (if it existed)Try to read the secrets again.
$ curl -s http://127.0.0.1:8100/v1/secret/data/customers/acme \
   | jq -r ".data.data"
The request fails and returns no data.
In the terminal where Vault Proxy is running, check the Vault Proxy logs.
...snip...
[INFO]  proxy.apiproxy: proxy received an invalid token error
[INFO]  proxy.auth.handler: invalid token found, re-authenticating
[INFO]  proxy.auth.handler: authenticating
[INFO]  proxy.auth.handler: authentication successful, sending token to sinks
[INFO]  proxy.auth.handler: starting renewal process
[INFO]  proxy.sink.file: token written: path=/user/vault-token-via-agent
[INFO]  proxy.auth.handler: renewed auth token
The log indicates
invalid token errorbecause you revoked the client token. The Vault Agent re-authenticate with Vault to get a new token, and stores it in thesinklocation.Try to read the secret. This time, you should received the secrets.
$ curl -s http://127.0.0.1:8100/v1/secret/data/customers/acme \
   | jq -r ".data.data"
Clean up
Press Ctrl + C to stop the running Vault Agent.
Unset the
VAULT_TOKEN,VAULT_NAMESPACEandVAULT_ADDRenvironment variables.$ unset VAULT_TOKEN VAULT_ADDR VAULT_NAMESPACEDelete the
$HOME/vault-testdirectory.$ cd .. && rm -r $HOME/vault-test
Summary
This tutorial demonstrated the basics of Vault Agent. You learned how to configure and run Vault Agent and Vault Proxy.
The use of token_file in the auto-auth stanza is a convenient way to start the Vault Agent or Vault Proxy. For a production deployment, use one of the supported auth methods so that the Vault Agent or Vault Proxy can properly manage the token's lifecycle.
See the following tutorials for auto-auth examples:
The Vault Agent Template demonstrated that the client application can remain Vault-unaware while Vault manages the secrets.
See the following tutorials to see more template examples: