Set up Kubernetes and Vault for Boundary
In this tutorial you will take on the role of the operations team to deploy
Boundary, Vault, and Kubernetes.
Prerequisites
This tutorial requires you to have completed the Connect to Kubernetes using Boundary introduction tutorial.
Deploy Kubernetes
(Persona: operations)
minikube is a CLI tool that provisions and manages the lifecycle of single-node Kubernetes cluster locally on your system.
Deploy a Kubernetes cluser using minikube.
Open a new terminal session.
Create a new working directory in your home directory called
boundary-kubernetesto complete the lab exercises. Execute all commands from this working directory unless otherwise specified.$ mkdir ~/boundary-kubernetes && cd ~/boundary-kubernetes/Start a Kubernetes cluster.
$ minikube start

😄  minikube v1.25.2 on Darwin 12.3
✨  Automatically selected the docker driver. Other choices: hyperkit, virtualbox, ssh
👍  Starting control plane node minikube in cluster minikube
🚜  Pulling base image ...
🔥  Creating docker container (CPUs=2, Memory=8100MB) ...
🐳  Preparing Kubernetes v1.23.3 on Docker 20.10.12 ...
    ▪ kubelet.housekeeping-interval=5m
    ▪ Generating certificates and keys ...
    ▪ Booting up control plane ...
    ▪ Configuring RBAC rules ...
🔎  Verifying Kubernetes components...
    ▪ Using image gcr.io/k8s-minikube/storage-provisioner:v5
🌟  Enabled addons: storage-provisioner
🏄  Done! kubectl is now configured to use "minikube" cluster and "default" namespace by default
The initialization process takes several minutes as it retrieves any necessary dependencies and executes various container images.
Verify the status of the Minikube cluster.
$ minikube status

minikube
type: Control Plane
host: Running
kubelet: Running
apiserver: Running
kubeconfig: Configured
Kubernetes is now set up.
Start a pod that represents a production workload a
developermay need to view.$ kubectl run nginx --image=nginx pod/nginx created
Deploy Boundary
(Persona: operations)
HashiCorp Boundary is an identity-aware proxy aimed at simplifying and securing least-privileged access to cloud infrastructure.
In this workflow you will test integrating Kubernetes with Boundary's dev mode.
Open a new terminal window, and start Boundary in
devmode:$ boundary dev ==> Boundary server configuration: [Controller] AEAD Key Bytes: cXte2+fkVq/mnQ/VKO3cOL0bYQZKqJsQhWgPLvX9VsY= [Recovery] AEAD Key Bytes: XGcczs8FJ7lIwd8PQJaP34go/ILiPIeMs+7anHkK+vE= [Worker-Auth] AEAD Key Bytes: Y9A1Gw4Ja+IJbFtuGTSXLIw3L+aEPcwEpN+/lRqvWIQ= [Recovery] AEAD Type: aes-gcm [Root] AEAD Type: aes-gcm [Worker-Auth] AEAD Type: aes-gcm Cgo: disabled Controller Public Cluster Addr: 127.0.0.1:9201 Dev Database Container: bold_heisenberg Dev Database Url: postgres://postgres:password@localhost:55001/boundary?sslmode=disable Generated Admin Login Name: admin Generated Admin Password: password Generated Host Catalog Id: hcst_1234567890 Generated Host Id: hst_1234567890 Generated Host Set Id: hsst_1234567890 Generated Oidc Auth Method Id: amoidc_1234567890 Generated Org Scope Id: o_1234567890 Generated Password Auth Method Id: ampw_1234567890 Generated Project Scope Id: p_1234567890 Generated Target Id: ttcp_1234567890 Generated Unprivileged Login Name: user Generated Unprivileged Password: password Listener 1: tcp (addr: "127.0.0.1:9200", cors_allowed_headers: "[]", cors_allowed_origins: "[*]", cors_enabled: "true", max_request_duration: "1m30s", purpose: "api") Listener 2: tcp (addr: "127.0.0.1:9201", max_request_duration: "1m30s", purpose: "cluster") Listener 3: tcp (addr: "127.0.0.1:9203", max_request_duration: "1m30s", purpose: "ops") Listener 4: tcp (addr: "127.0.0.1:9202", max_request_duration: "1m30s", purpose: "proxy") Log Level: info Mlock: supported: false, enabled: false Version: Boundary v0.8.0 Version Sha: 9b48dbc2fd4f9a9f0bda4ca68488590f681dbd9e+CHANGES Worker Public Proxy Addr: 127.0.0.1:9202 ==> Boundary server started! Log data will stream in below: ... snip ...Dev mode starts Boundary to listen on port
9200and with a pre-configured administrative user namedadminand a password ofpassword. You will use the admin username and password to authenticate with Boundary.Return to the terminal you started Kubernetes in and set the
BOUNDARY_ADDRenvironment variable.$ export BOUNDARY_ADDR=http://127.0.0.1:9200Boundary is now set up.
Deploy Vault
(Persona: operations)
Vault is an identity-based secrets and encryption management system. Vault can generate secrets on-demand for some systems, such as AWS, and Kubernetes.
Select the appropriate tab to deploy an HCP Vault Dedicated cluster or deploy a Vault in dev mode.
Launch the HCP Portal and login.
From the Overview page, click Vault in the left navigation menu.
From the Vault overview click Create cluster under the Start from scratch section.

Select your preferred cloud provider.

Click the Vault tier pull down menu and select Development.
Click the Cluster size pull down menu and select Extra Small.
Under the Network section, accept or edit the Network ID, Region selection, and CIDR block for the HVN.
Leave Cluster accessibility set to Public.
Under the Basics section, accept or edit the default Cluster ID (
vault-cluster).
Under Templates, select Start from scratch.
Click Create cluster.
Wait for the cluster to initialize before proceeding.

Under Quick actions, click Public Cluster URL.
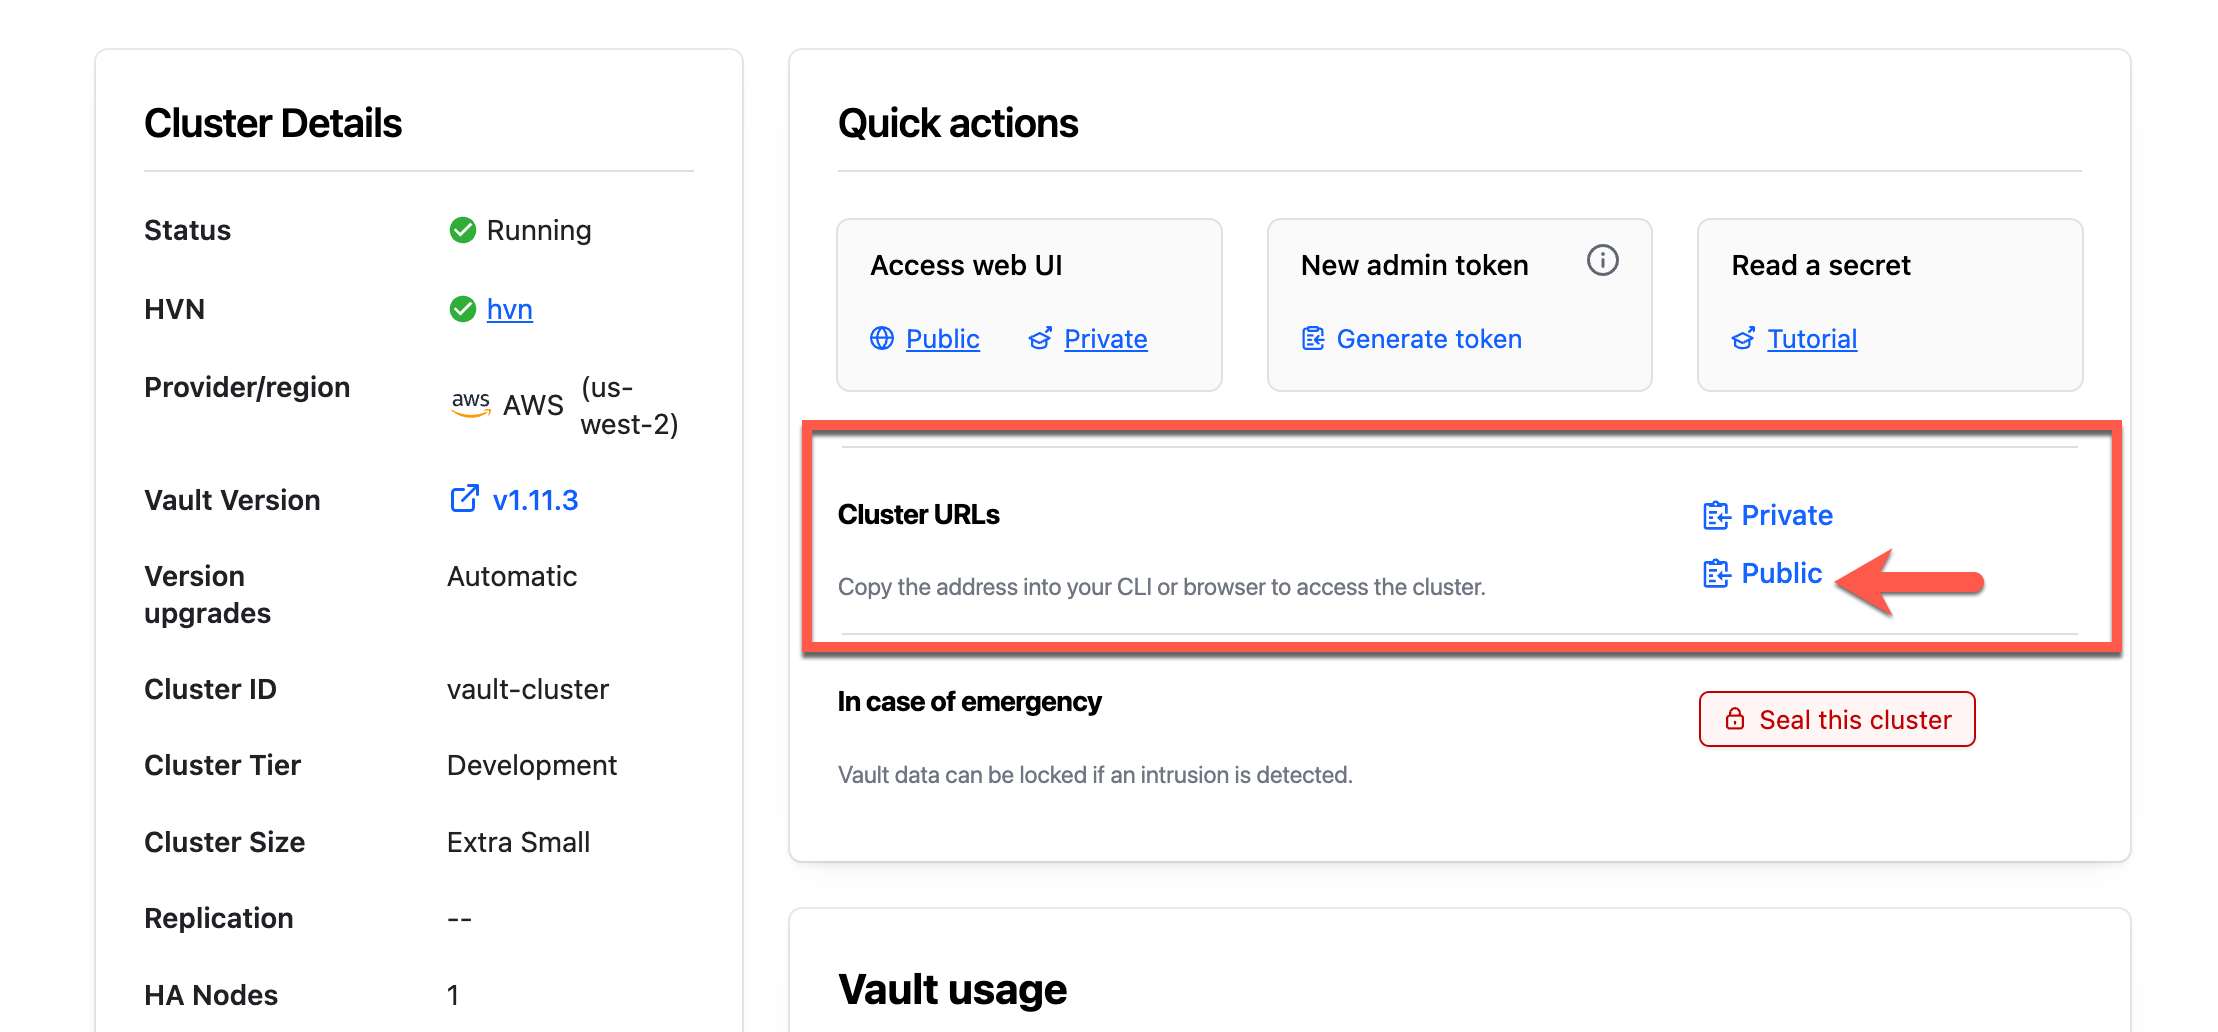
Return to the terminal you started Kubernetes in and set the
VAULT_ADDRenvironment variable to the copied URL.$ export VAULT_ADDR=<public_cluster_URL>Return to the Overview page and click Generate token.
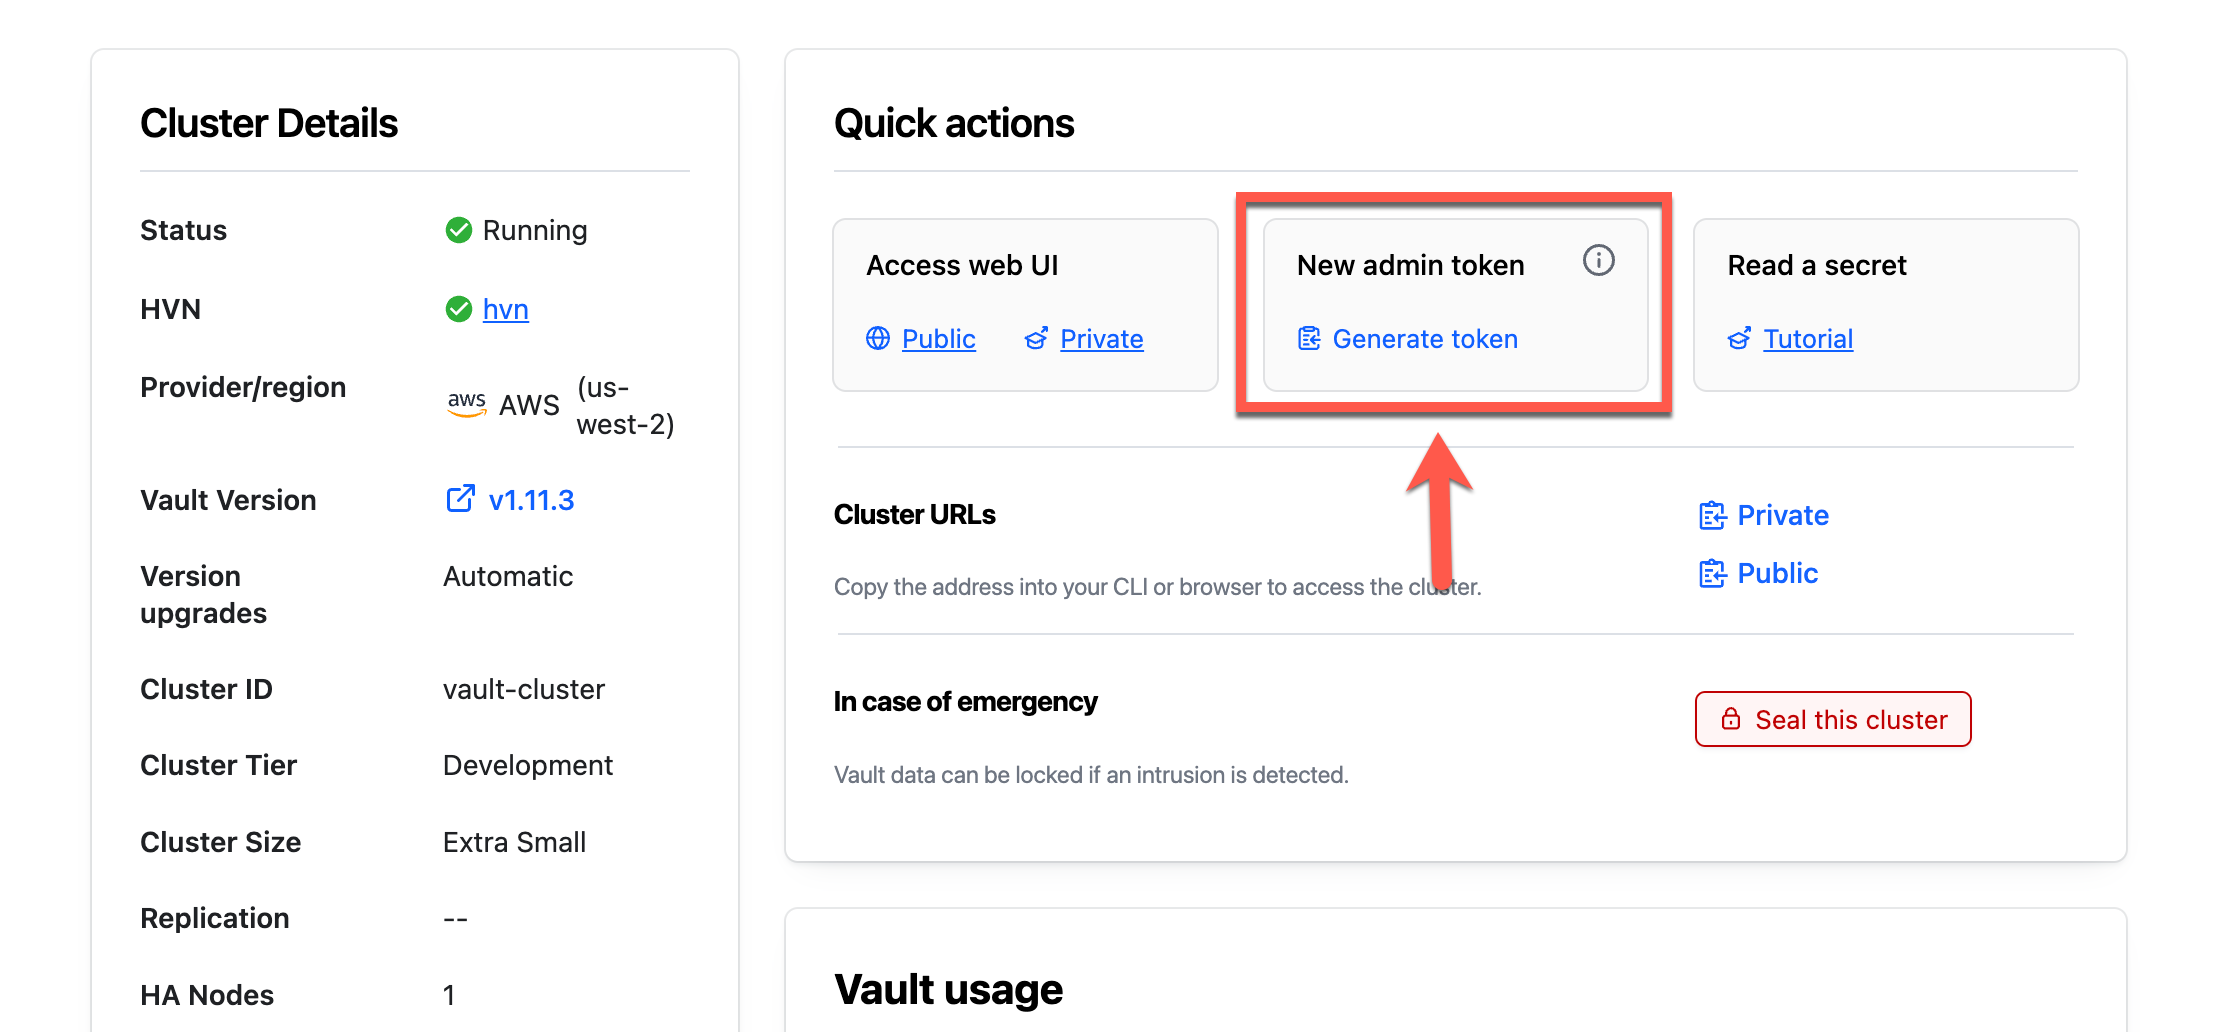
Within a few moments a new token will be generated.
Copy the Admin Token.
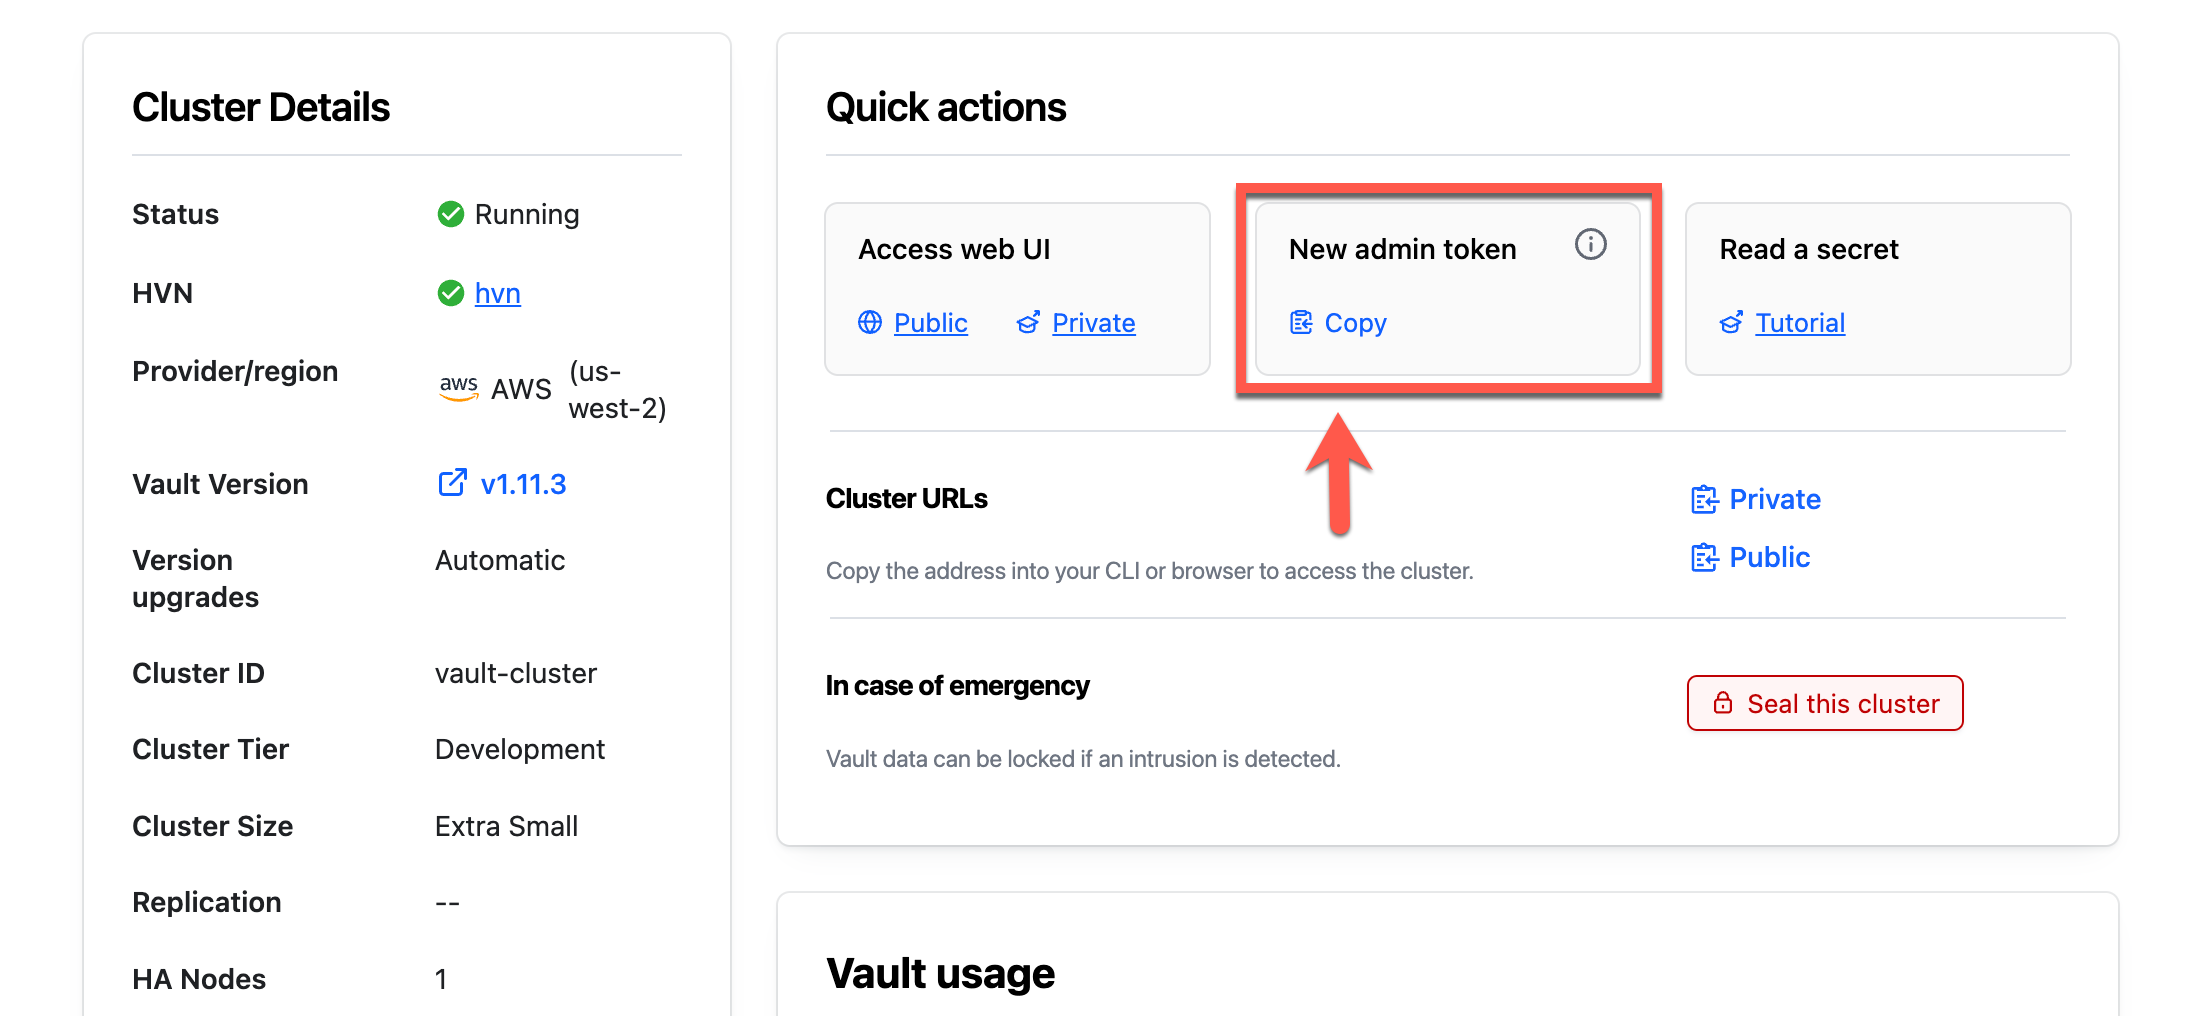
Return to the terminal you started Kubernetes in and set the
VAULT_TOKENenvironment variable to the copied token.$ export VAULT_TOKEN=<admin_token>Set the
VAULT_NAMESPACEenvironment variable toadmin.$ export VAULT_NAMESPACE=adminOpen a new terminal window, and start a proxy to expose the Kubernetes API.
$ kubectl proxy --disable-filter=true

Request filter disabled, your proxy is vulnerable to XSRF attacks, please be cautious
Starting to serve on 127.0.0.1:8001
Leave this terminal open with the proxy running.
Open a new terminal window, and start ngrok and create a tunnel to the proxy listening on port
8001.$ ngrok http --scheme=http 127.0.0.1:8001Example output:
ngrok                                                                                                                                                              (Ctrl+C to quit)

Session Status                online
Account                       username (Plan: Free)
Update                        update available (version 3.0.5, Ctrl-U to update)
Version                       3.1.1
Region                        United States (us)
Latency                       32.791235ms
Web Interface                 http://127.0.0.1:4040
Forwarding                    http://d12b-34-567-89-10.ngrok.io -> 127.0.0.1:8001

Connections                   ttl     opn     rt1     rt5     p50     p90
                              0       0       0.00    0.00    0.00    0.00
Leave this terminal open with ngrok running.
Copy the ngrok forwarding address.
Return to the terminal you started Kubernetes in and set an environment variable for the ngrok forwarding address.
$ export KUBE_API_URL=<actual-address-from-ngrok>Vault Dedicated is now set up.
Validate lab setup
The tutorials in this series use environment variables to simplify the provided commands.
Verify all necessary environment variables are set.
$ printenv | grep 'VAULT_\|BOUNDARY_\|KUBE_'
BOUNDARY_ADDR=https://6a6eade6-example.boundary.hashicorp.cloud
VAULT_ADDR=https://vault-cluster-exampe-012034567.06f0568a.z1.hashicorp.cloud:8200
VAULT_TOKEN=hvs.CAESIPA-K6F9TfY5Vm2nfObyzYum-peHhXPuYzX_BsybIKJMGicKImh2cy4wVXN4NWpyN3A4NUJ
VAULT_NAMESPACE=admin
KUBE_API_URL=http://d12b-34-567-89-10.ngrok.io
If you are missing any of the environment variables, go back and verify each product is running and set the required variables.
Verify connectivity by authenticating to Boundary. Enter the admin username and password when prompted.
$ boundary authenticate
Please enter the login name (it will be hidden):
Please enter the password (it will be hidden):

Authentication information:
  Account ID:      acctpw_NgTnYJHTls
  Auth Method ID:  ampw_PqQpz2sqvx
  Expiration Time: Wed, 19 Jul 2023 09:52:02 EDT
  User ID:         u_09ja9DkXo3

The token was successfully stored in the chosen keyring and is not displayed here.
Verify connectivity to Vault.
$ vault login token=$VAULT_TOKEN
WARNING! The VAULT_TOKEN environment variable is set! The value of this
variable will take precedence; if this is unwanted please unset VAULT_TOKEN or
update its value accordingly.

Success! You are now authenticated. The token information displayed below
is already stored in the token helper. You do NOT need to run "vault login"
again. Future Vault requests will automatically use this token.

Key                  Value
---                  -----
token                hvs.EXamPl3t7782QvHbHatL2f56i98VpKePzgqvHGicKImh2cy55bXZyMUVseWNZa00yem9pM3NuaHppRnQuOXpoQ0UQ9gE
token_accessor       tzwWshH6PwGHIFWq1dCCN2Xz.9zhCE
token_duration       5h54m30s
token_renewable      false
token_policies       ["default" "hcp-root"]
identity_policies    []
policies             ["default" "hcp-root"]
Verify connectivity to Kubernetes.
$ kubectl config view
apiVersion: v1
clusters:
- cluster:
    certificate-authority: /Users/username/.minikube/ca.crt
    extensions:
    - extension:
        last-update: Wed, 12 Jul 2023 10:04:18 EDT
        provider: minikube.sigs.k8s.io
        version: v1.30.1
      name: cluster_info
    server: https://127.0.0.1:63060
  name: minikube
contexts:
- context:
    cluster: minikube
    extensions:
    - extension:
        last-update: Wed, 12 Jul 2023 10:04:18 EDT
        provider: minikube.sigs.k8s.io
        version: v1.30.1
      name: context_info
    namespace: default
    user: minikube
  name: minikube
current-context: minikube
...snip...
A local
minikubecluster will be listed undercontexts.
Next steps
Boundary, Vault, and Kubernetes have been deployed and are ready to be configured.
In the Connect to Kubernetes using Boundary configuration tutorial, you will configure Kubernetes, configure Vault for Kubernetes, and configure Boundary to broker credentials from Vault to the Kubernetes cluster.